

I’m sure if you’ve been making stereoviews that at some point you’ve heard about the ‘stereo window’. You either curse it yourself for the close tree branch crossing two edges or hear someone else declaring a ‘window violation’ and looking rather smug for spotting it.
I think the hardest part at the beginning of stereo-photography can be understanding what the stereo window is and putting what is necessary behind it. Note though that the Victorians didn’t get too hung up on it, so don’t feel you have to lose sleep over it either. Stereoscopy is quite a niche passion and I don’t want to put anyone off, so please don’t feel you have to get too technical if you don’t want to.
A quick description of the stereo window: Think of the frame or the edges of the stereo-image as an open window through which you are looking. Everything in the image should be beyond the window frame, unless the picture contains elements that can come through the window at the spectator. For instance, imagine a postman handing a letter through the open window. The letter and the postman’s arm can come through the window, but the rest of his body cannot because in real life this is impossible. Similarly, the end of a tree branch can come through an open window, but not the trunk of the tree since it is rooted in the ground.
A lot of vintage stereos do not take this “window” into account because it was not considered important at the time and also because the images, when seen in the stereoscope, are still quite small. Things are different when these images are projected on a large screen and “window violations” can then be pretty painful to look at because projection is unforgiving.
The easiest way for me to try and put everything at or behind the stereo window and explain it is: I find the closest part of the image to me, as the photographer or the viewer, and align both images to that point – this will bring it to the stereo window and everything beyond it is behind the stereo window. In StereoPhoto Maker I use the Easy Adjustment tool and manually align it to that closest point (see my StereoPhoto Maker tutorial as this also explains about background deviation for comfortable viewing). In the mobile phone apps 3DSteroid Pro or i3DSteroid I use the Edit option and move the image around with my finger, or use the arrow keys, until they are aligned at this closest point (see each individual tutorial for recommendations for comfortable viewing).
If the image is still coming out of the stereo window, or you just want everything further behind it, I like to remember: In the parallel-view format you move the RIGHT image to the RIGHT to push everything behind the window (RECEDE), likewise if you moved the left image to the left it will also recede. If you recede it too much though you’ll cause too much deviation between the two images’ backgrounds, which will not look great in stereo; your brain will struggle to fuse the images and you’ll make a small kitten cry. Try playing with the alignment of your stereoviews until you get used to seeing what is comfortable to view and behind the stereo window. Maybe save a copy of each stereoview in your favourite format as you move the stereo window a little further each time, so you can ‘spot the difference’. It’s easier to see window violations when the images are large so try looking at them on as big a screen as possible. Just remember to have fun! I’m including several examples so I hope you can see what this stereo window is by the end of this tutorial.
Anyway, enough typing, let’s see some examples (the images are hosted in Flickr so click on them for enlargements, depending on your screen).
STEREOPHOTO MAKER STEREO WINDOW
The closest part of the image to me in the image below is probably the display unit on the left-hand side. I used the Easy Adjustment tool to align both images at this point to get it at the window and everything else behind the window, you can check with your red and cyan anaglyph glasses (remember the red lens should be on the left eye):

In the parallel-view format with everything at or behind the stereo window:

In the cross-view format with everything at or behind the stereo window:

In the red and cyan anaglyph format with everything at or behind the stereo window:
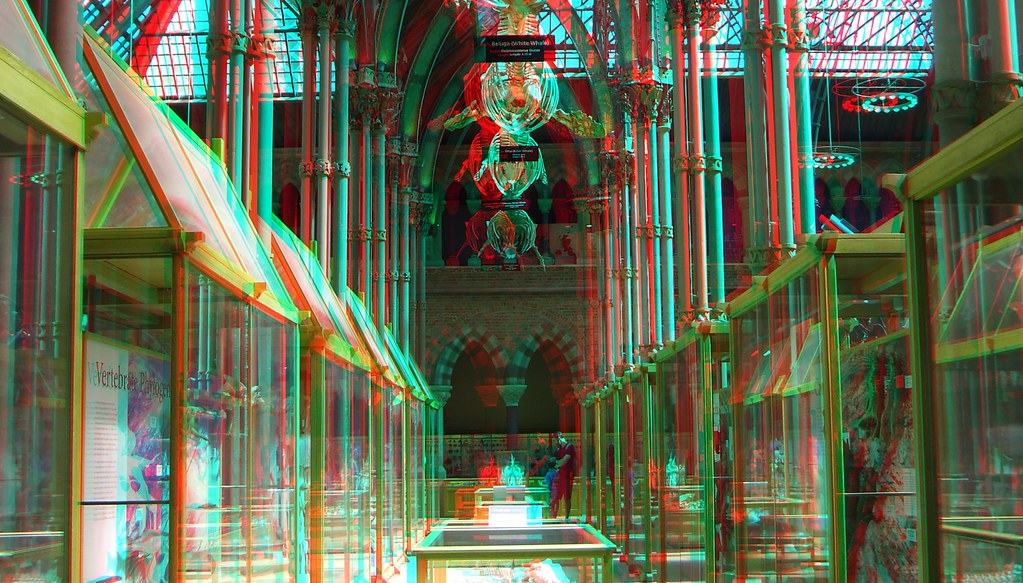
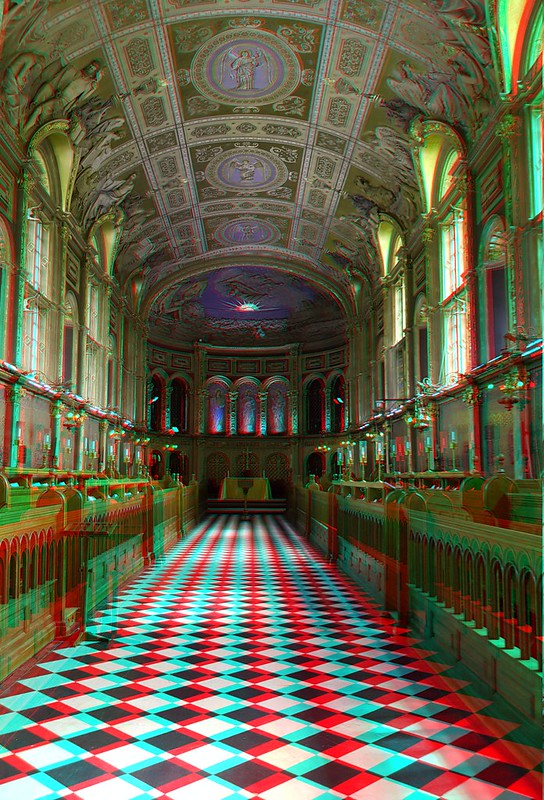
I then aligned the images to the back wall and arches so that everything in front of these now comes out of the stereo window. As the display cases, pillars and hanging skeleton are touching the borders and are rooted to the ground/ceiling, they shouldn’t come through this window. The perfectionists will be shouting ‘WINDOW VIOLATION!’ If you can’t see anything coming out of the stereo window, then notice how the display cases are chopped at the edges, the stereo really doesn’t work very well (remember to scroll back and forth to compare the same image going in and out of the stereo window):

In the parallel-view format with everything in front of the wall coming out of the stereo window (window violation):

In the cross-view format with everything in front of the wall coming out of the stereo window (window violation):

In the anaglyph format with everything in front of the wall coming out of the stereo window (window violation):

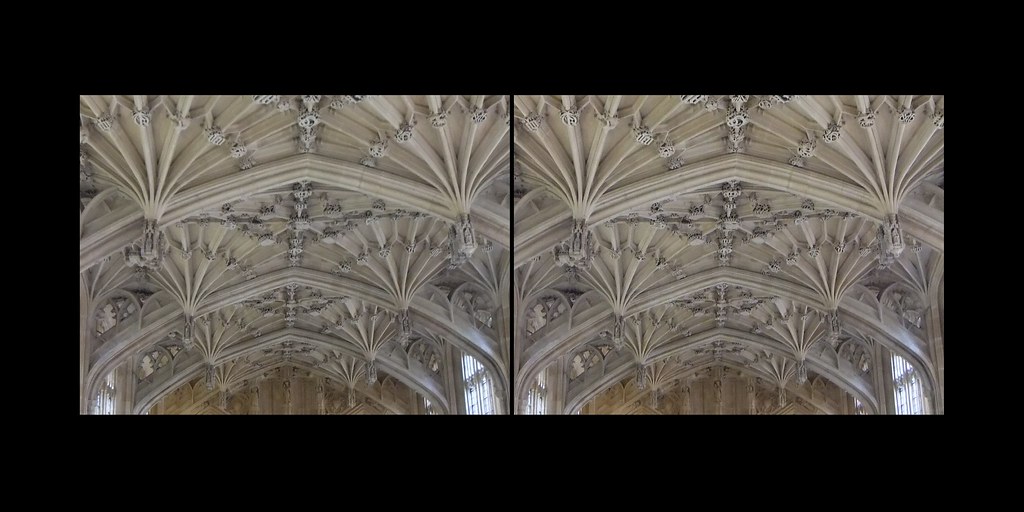
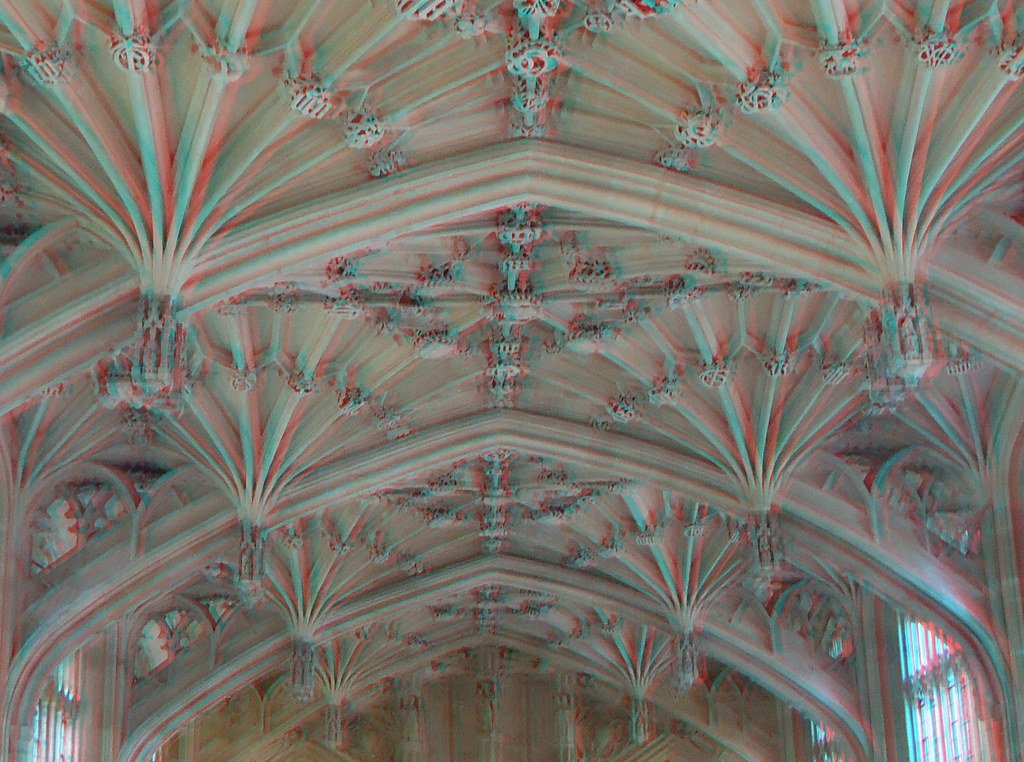
The following stereoview has less depth and background deviation, so it is trickier to spot the window violation when you’re just getting used to them, especially if you’re looking on a small screen. I was evil and thought it would be good to practise with. The closest part of the image to me is probably the top centre. I used the Easy Adjustment tool to align both images at this point and bring it to the window, with everything else behind the window, you can check with your red-cyan anaglyph glasses:

In the parallel-view format with everything at or behind the stereo-window:

In the cross-view format with everything at or behind the window:

In the anaglyph format with everything at or behind the stereo-window:

I then aligned the images to the back wall, now everything in front of it comes out of the stereo window and because the ceiling shouldn’t come through this window it will really upset the physicists too. The perfectionists will be shouting ‘Window Violation!’

In the parallel-view format with everything in front of the back wall coming out of the stereo window (window violation):
In the cross-view format with everything in front of the back wall coming out of the stereo window (window violation):

In the anaglyph format with everything in front of the back wall coming out of the stereo window (window violation):
I3DSTEROID/ 3DSTEROID PRO APPS STEREO WINDOW
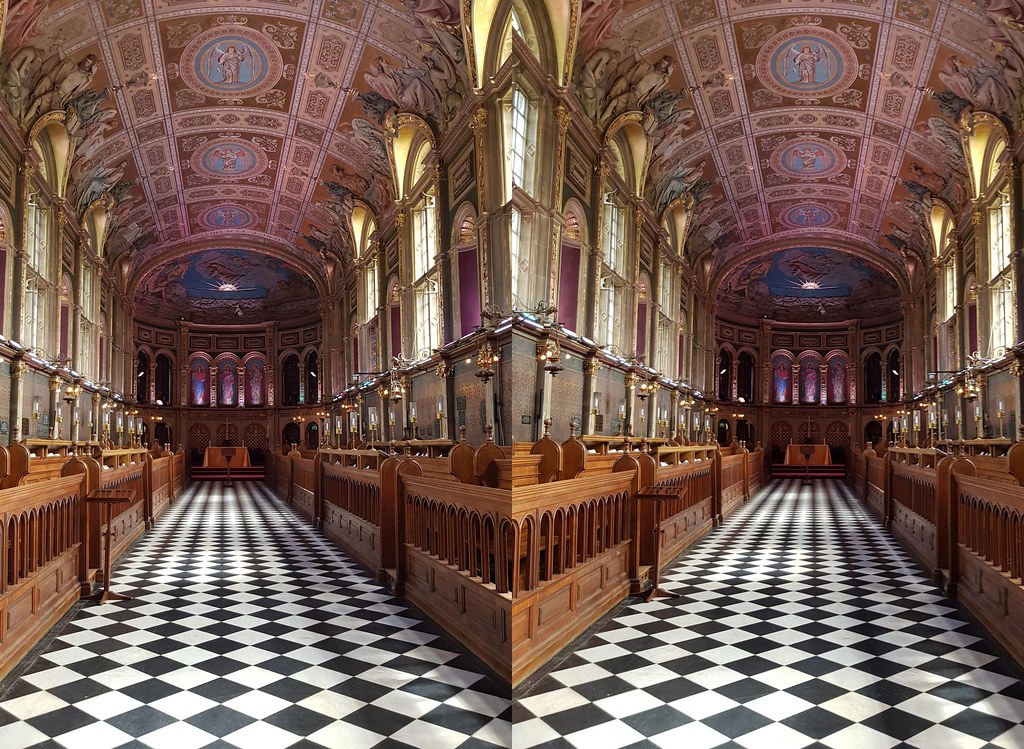
I’ll start with a stereo with lots of depth (it may hurt on a big screen and also in anaglyph sorry, definitely don’t project this as there’s too much deviation between the sequential photos). The closest part of the image to me, as the viewer, is the floor at the bottom. I aligned it there to bring it to the window and push everything else behind the stereo window. Please note that I’m much more accurate at aligning things manually on StereoPhoto Maker than with the smartphone apps; I find that the mobile apps also change the alignment when I switch between side-by-side views and anaglyphs:

In the parallel-view format with everything at or behind the stereo window:
In the cross-view format with everything at or behind the stereo window:

In the anaglyph format with everything at or behind the stereo window:

I then aligned the images to the table at the far back using the Edit tool. Now everything in front of it comes out of the stereo window and because the floor, walls, ceiling and wooden panels are touching the borders, and the laws of physics state they shouldn’t come through this window, the perfectionists will be shouting ‘Window Violation!’ If you’re unsure, look especially at the sides of the images to see how they’re coming out and are chopped, the depth just isn’t as good. Make sure you scroll back and forth to compare the images inside and outside of the stereo window:

In the parallel-view format with everything in front of the far table coming out of the stereo window (window violation):

In the cross-view format with everything in front of the far table coming out of the stereo window (window violation):

In the anaglyph format with everything in front of the far table coming out of the stereo window (window violation):
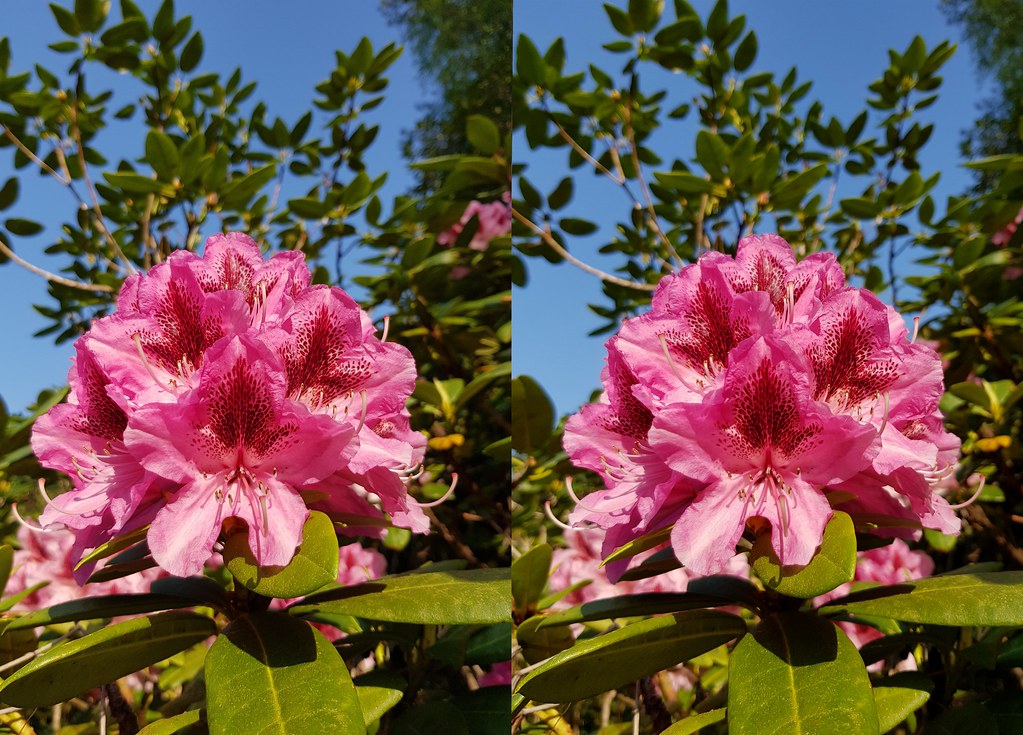
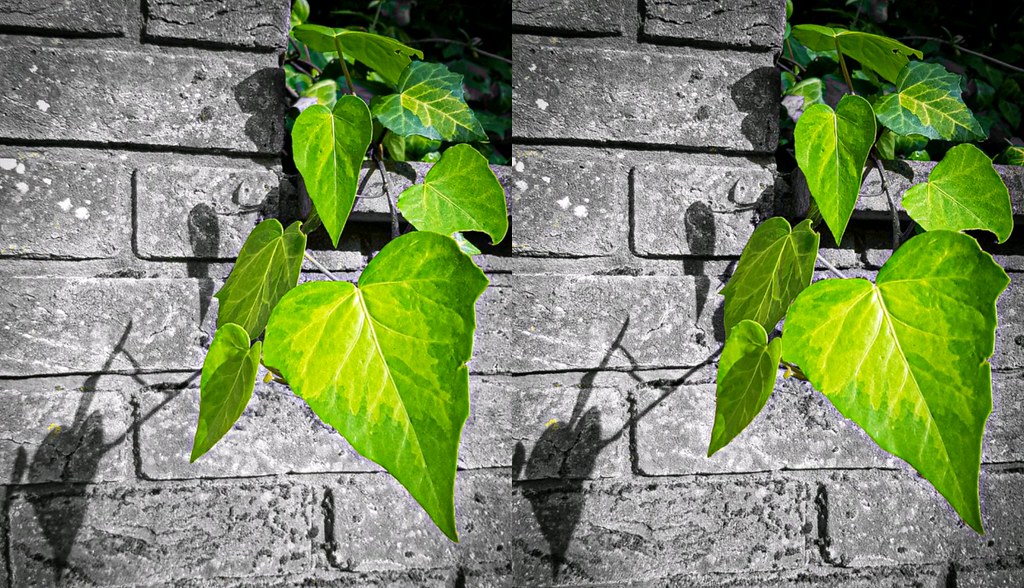
The following stereoview has less depth and background deviation, it may be tricker to spot the window violation when you’re just getting used to them, especially if you’re looking on a small screen. I was evil again and thought it would be another good one to practise with. The closest part of the image to me is the leaf at the middle-bottom, which is touching the frame. I used the Edit tool to align both images at this point and bring it to the window, with everything else behind the window:

In the parallel-view format with everything at or behind the stereo window:
In the cross-view format with everything at or behind the stereo window:

In the anaglyph format with everything at or behind the stereo window:

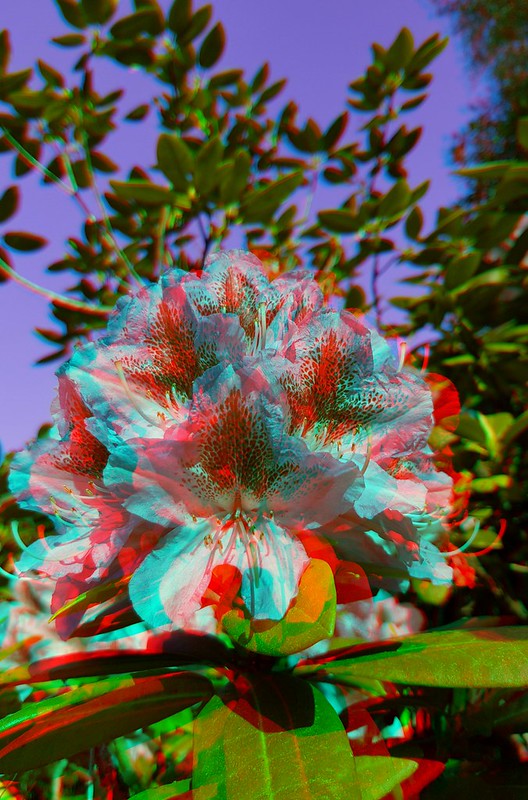
I then aligned the images to the leaves at the far back using the Edit tool. Now everything in front of them comes out of the stereo window and because the closer leaves and background branches are touching the borders, they shouldn’t come through this window. The perfectionists will be shouting ‘Window violation!’ If you’re unsure, look especially at the sides of the images to see how they’re coming out and are chopped; the depth also just doesn’t work as well. Make sure you scroll back and forth to compare the images inside and outside of the stereo window:

In the parallel-view format with everything in front of the far leaves coming out of the stereo window (window violation):

In the cross-view format with everything in front of the far leaves coming out of the stereo window (window violation):

In the anaglyph format with everything in front of the far leaves coming out of the stereo window (window violation):
And one last example for a bit of fun. Remember that I wrote that things which can’t physically come out of the window (such as what is touching the frame/borders, a tree trunk in the ground, a whole person standing on the floor, etc) should stay behind it? Well, you can make things which can physically come through windows….come out of the stereo window.
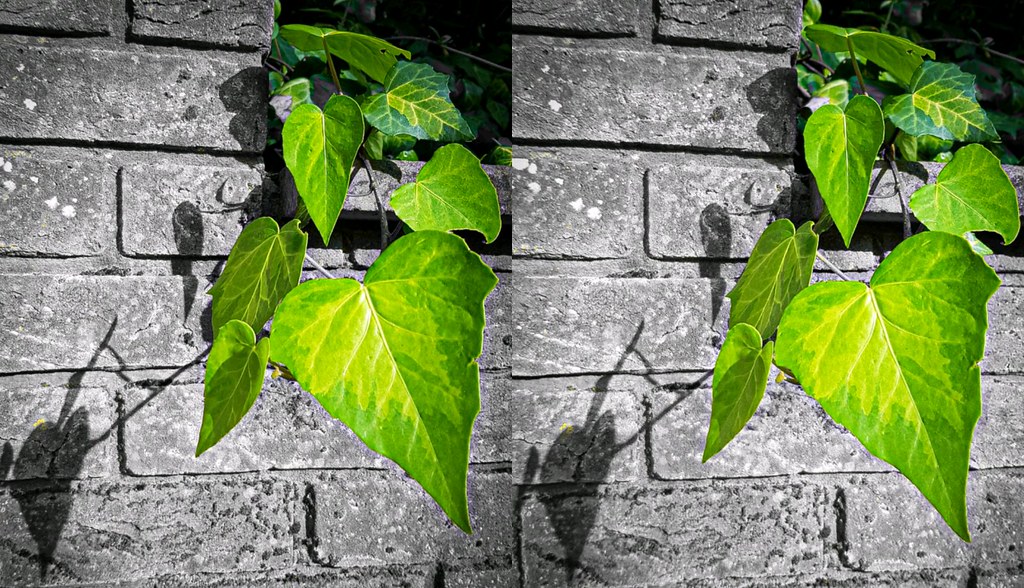
The ivy in the following example is only anchored at the wall. It’s not touching the sides of the photo’s frame/ window, so it can come out of it and it’s not classed as a violation. First I’m going to align the two images so that everything is at or behind the window. The closest part of the image to me is the front ivy leaf, so I used the Edit tool to align both images at this point (or very nearly aligned as you’ll see in the picture!):

In the parallel-view format with everything (almost) at or behind the stereo window:
In the cross-view format with everything (almost) at or behind the stereo window:
In the anaglyph format with everything (almost) at or behind the stereo window:

And then using the Edit tool I aligned the stereoview at the wall, so the ivy branch can come out of the stereo window and nearly smack you in the face (in the nicest possible way!). Remember to scroll back and forth to compare the depth and stereo window between the two sets of alignment, you’ll see it gets much more exaggerated:

In the parallel-view format with everything in front of the wall coming out of the stereo window (coming at you!):

In the cross-view format with everything in front of the wall coming out of the stereo window (coming at you!):

In the anaglyph format with everything in front of the wall coming out of the stereo window (coming at you – this works much better on a small screen because of the large background deviation):

When something is purposely coming out of the window and you’re wearing anaglyph glasses (and if the screen/monitor/picture is big enough), try moving your head from side to side whilst looking at the image to see it move. It’s sooooo cool!
Please keep in mind that if you move too much between your sequential shots, or are too close to the subject with a stereo-camera, the difference between the two images may be so great that you cannot fuse them or it’s uncomfortable when you try. This is regardless of how nicely aligned the foreground is. If you then align the background, the foreground will pop-out of the window, which may also give violations and reduce the depth of the stereoview. It’s sometimes better to take several shots a little bit further apart each time, if you’re making a sequential stereoview, and find the two which give the most comfortable viewing. With a stereo-camera you can move a little closer to, or further away from, the subject each time and find the best pair. Please see my smartphone and StereoPhoto Maker tutorials for the 1/30th rule for comfortable viewing. The image I’ve used of the interior of a chapel has a deviation of 1/10th between the backgrounds of the two images when the foregrounds are aligned; this is way too much and I wouldn’t even try to project it (unless I purposely wanted to make someone sick). It’s just to hopefully clearly demonstrate window violations on smaller screens.
If you’re still awake I hope you found this tutorial useful and you can now see what’s in the stereo window, what’s out, and why some strange people shout or type ‘window violation’ like it’s the plague.
Personal back story: After I plucked up the courage to join a regional stereo club, I’m afraid I don’t have happy memories of my first experiences there. Two people went through some of my photos and got overly excited and rude about window violations, which in the grand scheme of things don’t really matter a great deal for personal photos which aren’t being shared or enlarged. I was made to feel I wasn’t very good at stereoscopy because I hadn’t abided by some of their most precious rules, including choosing to use a single lens camera to make hyper stereos in favour of a stereo camera. I’ve also often encountered similar people in the small community since. Thankfully my personal enjoyment from taking and viewing stereos overcame being put off by rule groupies (whose own photos were far from perfect I might add!), who tried to suck the fun out in favour of technicalities. Please don’t feel put off if you’re unsure about the stereo window and don’t feel you have to get bogged down by it or pressured into it if you don’t want to. The most important thing is to find your own enjoyment in stereoscopy, if worrying about the stereo window isn’t part of that enjoyment, then please ignore this massively long post. She writes right at the end, after you’ve spent the last 6 months reading it 😉 If your enjoyment does include the stereo window, then get stuck in!
If you need any further help or you have any comments please get in touch.

Copyright © The Stereoscopy Blog. All rights reserved.

Thanks for the tutorial!! I think it’s starting to click. Cathedral picture really stood out as a violation. The child was harder to see. It helped a lot to see how you’d lined the pictures up with the anaglyph. While trying this out on my own I found it helpful to have a bit of a window. Then I could really see where the window was in relation to my view.
So all we need to do is to line up the closest thing in the picture? Unless we want to pop something out of the window on purpose?
Thank you!!! 👏 I’ll be redoing my latest 😀
LikeLike
Yes if you align the closest part of the image it’ll bring it to the stereo window and everything else beyond it is behind the window. If you decide you want to push it a little further behind the window then (in the parallel-view format) move the right image to the right to recede it.
I find it best with StereoPhoto Maker to use the Easy Adjustment tool with anaglyph glasses on to see in real time what works and is comfortable as you slide the bar to the right and watch it recede, or if you’re playing with something coming out of the window then don’t recede it. Just watch the backgrounds don’t move too far apart though, I’ve had a few fails when I get too excited and take my sequential photos too far apart – I get the foreground lovely and aligned and then when I look at the background it’s way more than a 1/30th of the distance and makes me feel sick – these are sometimes OK for Instagram though and small screens.
I thought this tutorial would be the easiest way to explain things because it’s not always easy to spot the stereo window, especially on smaller screens so I’m really pleased you’ve found it useful, thank you so much for the feedback, I look forward to seeing your results!
LikeLike