

**Update Nov 2023: The developer has updated the app to make it compatible with Android 13, as such the destination folder of photos and editing files has changed to /Pictures.**
You don’t need expensive cameras or software to make your own stereoscopic 3-D images, it’s relatively easy. There’s currently a real buzz on social media with people making their own stereoviews with smartphones and sharing them, especially on Instagram, so this tutorial will be keeping this in mind. You can also use this app to edit 3-D photos taken with the QooCam EGO.
The easiest way to make a stereoview with a smartphone is by using the phone’s camera to take two images sequentially and using an app to align and save them as a stereo-image.
I’m using the Android version for this tutorial, but there is a separate tutorial for the iPhone version here because the apps vary slightly.

There are lots of apps available, but I find one of the best and easiest to use is called ‘3DSteroid Pro’ for Android. A free version called ‘3DSteroid’ is available, however, it doesn’t allow you to save the images. With the Pro versions costing £2.29 in the Play Store, it’s not too expensive. A free alternative app is ‘CrossCam’, which does not have the complete functionality of 3DSteroid Pro, but has full instructions inside the app.
Please note this is an old screenshot so I must warn you about the extra 29p, still less than a coffee!
TAKING A STEREO-PHOTO
On the Android version, when first opening the 3DSteroid Pro app, you’ll see the following screen:

When you press on the camera icon (top right), you’ll see that you can take photos in landscape or portrait format by turning the phone. Keeping Instagram in mind, the portrait format is usually used; for a photo-sharing platform, this isn’t really the best way to show the depth and quality of your stereoviews as Instagram prefers small and square images. I’m sticking with it though, so I can hang out with the cool 3-D kids.
For other ways of displaying the stereoviews, such as viewing the images on a 3-D TV or by projection, of course, the landscape format can be used and is preferable. Landscape images can also be cropped later.

The app allows you to click on the screen to get that part of the image in focus, as long as the Auto Focus/AF icon on the top left is selected. There is also a spirit level line that goes from red to green as you make the phone level to help with alignment. When you’re in focus and level, click on the shutter icon to take the first image.
The top right number tells you the angle at which you are holding your phone, so you can ensure it’s the same for both photographs. This is an important feature when making phantograms, but it also generally helps you to see how level the camera is between shots. The top right face icon also reminds you which image you’re taking, left or right, just in case you get distracted in the milliseconds between shots. It can happen, I don’t judge!
As I prefer to view and save my images in the parallel-view format, I always take the left image first. Other people prefer the cross-view format, so you could take the right image first. It’s not essential which you take first, as you can swap the left and right images later anyway.

Once the first image is taken, you’ll see a ghost of it whilst taking the second image. This is to help with alignment and to see the separation of the images.
MAKING IMAGES COMFORTABLE TO VIEW
The very general rule of thumb for comfortable 3-D viewing is to move from left to right 1/30th of the distance between you and the subject, this is to avoid excessive background deviation. For close subjects, this movement can be a minute amount, e.g. 0.5cm for an object 15cm away. Instagram and phone screens, however, are quite forgiving as the images are so small, so being precise and sticking to rules isn’t always necessary. If the image is projected, however, a big deviation can be too much for the brain to fuse, or be extremely uncomfortable to view. Always keep in mind what your eventual aim for the stereoview is; what works well on a small screen doesn’t always work for projection, when the image is much enlarged.
Sometimes exaggerating the depth (also called a hyperstereo) actually looks better up to a point. Keep in mind that if you want to use these images at a later date, to print as a card or to project, they may not be suitable. There may be too much separation and make you feel a bit ooky, technical term. I’m guilty of sometimes moving excessively between taking the left and right images when I’m excited, this is especially evident in my cat stereoviews, I pretend I wanted to make a hyperstereo anyway. I think it’s more important to have fun when making stereoviews than to sweat over perfection every single time.
If you’re taking an image of a particular subject, keep an eye on anything that is in the foreground which may ruin your stereoview. It may cause it to have too much deviation, or distraction, between the two images, such as tree branches, plants or friendly cats. Sometimes though, this can be cropped or cloned out later.
Also try and keep the camera as level as possible, both horizontally and vertically between the two photos. Moving slightly closer, or skewing the camera between shots, can sometimes cause a stereoview to be unusable, but you will find this with practice. You can experiment with digital and just delete any failures.
It’s all a learning curve so don’t feel you fail because you can’t use every image, you have to expect it.
THE CHA-CHA METHOD
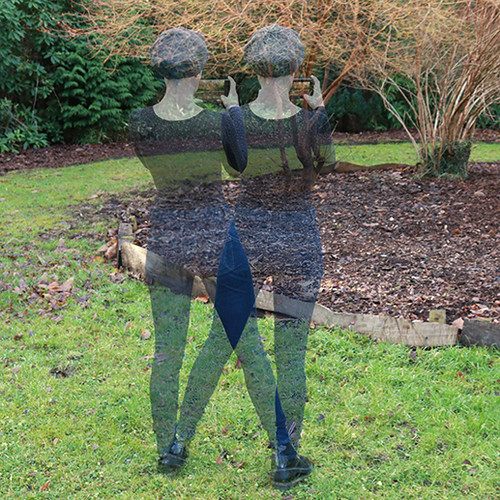
If you’re taking a stereoview of a more distant object, such as a building, tree, etc., people recommend a rocking method, also called the cha-cha method. See the image above, but please note that I’m not really a ghost! It involves standing with your feet slightly apart, but well balanced, and your elbows tight to your sides, with the camera held in the middle. You move your weight to your left foot, so the camera is on the left, to take the first photo. You then transfer the weight to your right foot, which will also move the camera to the right, allowing you to take the second photo.
Personally, I don’t use the cha-cha method. I try and judge the distance and move the camera accordingly, instead of my whole body. You can bust some moves if you want, all in the name of 3-D! Remember to check for anything in the foreground that may be too close for the distance you’re moving. Also check when people, vehicles, clouds, animals, etc., are in shot for movement, as this can be very distracting when trying to fuse two images showing different movements into one 3-D image. Have you ever tried to tell an awake cat or small child to stand still though?! As I mentioned before, also try and keep the camera as level as possible between shots; if you find this difficult, you can buy a sliding bar.
AUTOMATICALLY ALIGNING YOUR IMAGES
Now you have two images to make a stereoview. The app is usually set by default to automatically align the images as soon as they are taken; this can, however, be changed in the settings. You can also press the wizard hat icon (Auto Adj.) to adjust them, and the app will automatically tell you the deviation.

Now you have your aligned stereopair. Congratulations! If you can free-view stereoviews, or if you have a stereoscope, the left eye image will be on the left and the right eye image will be on the right, ready to view. The London Stereoscopic Company’s OWL viewers work well with smartphones, especially the VR Kit with a magnetic plate to hold your phone. Lots of other viewers tend to over-magnify and hurt your brain! If you’re a natural cross-viewer, you can click on the swap icon, and the app will swap the left and right images. You can look on-point as you go cross-eyed at your phone.
MANUAL ALIGNMENT
If you’re unhappy with the automatic alignment, you can also manually align them by pressing the ‘edit’ icon, which will take you to the following screen:

You can now press and move your finger across the screen, or use the arrows, to move the right image and align it to your heart’s content. Please see above for the general rules about aligning the two images to make a 3-D image comfortable to view. To also keep it in the ‘stereo window’, please see this post. I aligned this stereoview manually by ensuring the closest part of the image to the viewer, the bottom left leaf, was aligned in the two images.
CROPPING YOUR IMAGES
You can also use this edit screen to rotate or crop the image. In mine, I used the crop function by clicking on the crop icon, then moving the lines with my finger to remove the leaf in the bottom left, which I felt was too close, and some of the background:

If you wish to make your image a set size or ratio, such as a square, you can click on ‘123’ (top right), and either enter the values manually or click on the ratio you’d like:

I didn’t square my image because it wasn’t the right ratio for the rhododendrons I photographed. When I was happy with the cropping, I clicked ok. I then used my fingers to manually realign the closest part of the image now the leaf was cropped out, which is now the petals in the middle. I then pressed ok.

SAVING YOUR STEREOVIEW
If you’re happy with the image you can save it as a stereoview to your phone by clicking on the ‘Menu’ tab (top left), and then on save:

You’ll be offered several different options to save the image. I tend to save mine with the highest resolution possible in case I want to project it at some point, but remember to keep an eye on your phone’s available storage.

The file is now saved in a folder called camera_saved in your gallery and from there can be uploaded to Instagram.

Congratulations, you’ve made your first parallel stereoview! I find the one I’ve just made a little bit boring and doesn’t have much depth so let’s have a look at the new border features to make it a little more fun. Later, we’ll look at the other types of stereoview which you can save it as.
ADDING BORDERS

If you click Stereo (the eyes icon) it will give you several options; the one used previously was parallel-view and it was how the Victorians used to show the vast majority of their stereoviews for use in stereoscopes. I’m going to keep it in this format but change the frame. Click on ‘SBS Frame’ (side by side).

Then you’ll see an R icon on the top left, click on this too and it’ll show options for the border:

The width increases the border between the images, as well as at the edges, and the round increases the rounding of the corners. As this isn’t a square image I can’t increase it to 50% as it will cut out some of my lovely lovely flowers, so I’ll keep it at a measly 5% for now.
If you also want to change the colour of the border to match your image, click on ‘Pick Color’.

On the thumbnail of your image you can click anywhere to choose a colour from it, then click on ‘PICK’ and OK.
I mentioned previously that most people tend to either be able to cross-view or parallel-view without a stereoscope. Using the LR/RL stereo will allow the stereoview to be displayed as a Cross-view at the bottom and a parallel view at the top; we’re here to please everyone! To use this, click on the ‘LR/RL’ icon in the Stereo menu and OK, then save as before. You now have a multi-view stereoview with a snazzier border, huzzah!

OPENING IMAGES SAVED ON YOUR PHONE
You can also open images that you have taken previously with your phone’s camera, or saved in the memory, such as those taken by the QooCam EGO.
Click the ‘Menu’ icon (top left), and then ‘Open File’. This opens up the possibility of you taking many sequential images a small distance further apart each time and choosing a pair from them for the best depth and quality.

You can click on two images that make the left and right pair, or a single stereoview image that already contains the left and right images:


If you find the images are on the wrong orientation once opened, as seems to be the case every time with me, just click on the ‘ORNT’ icon and change it to suit the images.
ADDING CIRCULAR BORDERS
I’m going to edit a stereoview I made previously of rhododendrons (yet more of them, sorry but I did write this tutorial in the spring lockdown!). I’m choosing this one because I can crop it into a square stereoview, which allows me to add a completely round border. Like previously, once I’ve opened the images I’ll do an automatic adjustment, then go to the ‘Edit’ menu and crop.


Clicking on the top right ‘123’ icon will offer me the option to crop it in a 1:1 ratio for a square.

It will now show a square which you can move around with a finger to the spot which you want it cropping to. I want to make sure that if I use a round border the edges of the flower petals aren’t touching this border so I’m moving the flowers to a more central position and ensuring there is enough room for the border.

After clicking ok I’ll double-check the alignment and make sure the closest part of the image to me is aligned in both (the leaf in the bottom left) to keep it in the stereo-window. It uses the same settings from the previous stereoview which I’ve made so you’ll see the LR/RL format and coloured border:

So now click on the ‘Stereo’ Icon:

And then the top left ‘R’ icon to open the border settings:

And now I’m changing the Round to 50% to make sure the border is circular:

Et Voila! You now have a round border to compliment your image:

Press ok and save as before if you’re happy with the image. Now you have a funky circular coloured border for your stereoviews, check you out!

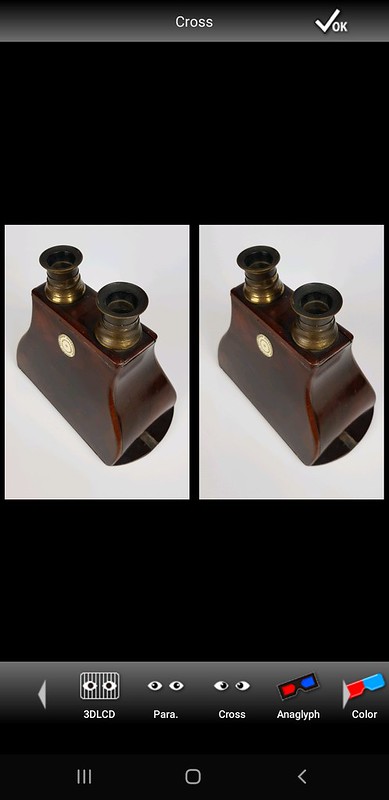
CROSS-VIEW AND ANAGLYPH
Let’s now have a look at a couple of other formats. If you decide you want to save an image as a singular cross-view then you can click on the Stereo icon, then ‘Cross’ and OK:

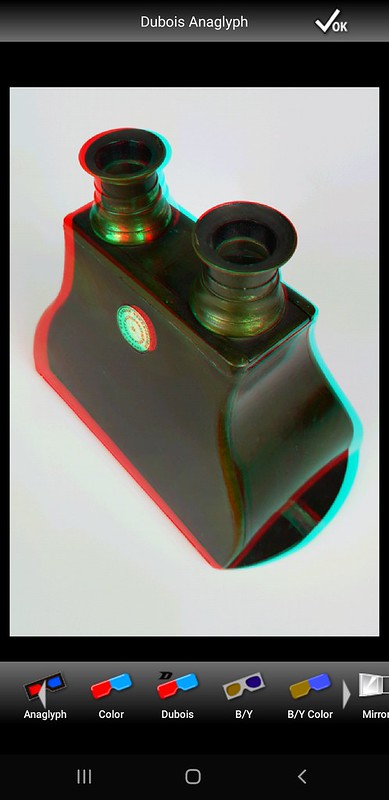
You may also decide that you wish to view and save the image as an anaglyph. Anaglyphs are a good way of showing landscape format images in 3-D because the side-by-side images usually require quite a bit of cropping to get them in the correct format for stereocards and especially for Instagram. The 3DSteroid Pro app also allows you to convert your stereoview into an anaglyph. Again, click on the Stereo Icon, and make sure the image is in the ‘Parallel’ format before then clicking on Anaglyph. There are a few anaglyph options, a black and white anaglyph, a colour anaglyph and a Dubois colour anaglyph (slightly adjusted colours). I recommend trying all of them to find which option suits the colours of your image the best.

The developer of the 3DSteroid pro app, Masuji Suto, has a great website with more tutorials for it and other 3-D apps which can be found here. I must thank Masuji Suto for allowing me to be part of the beta testing for the new 64-bit Android app; I had hoped he’d bring all of the new functions of the iPhone app to Android and he jolly well did and more. He’s a great ambassador for stereoscopy.
Please note the images I’ve taken of the Brewster stereoscope for this tutorial are very simple (and not particularly inspiring because taking screenshots at the same time as taking the photos proved quite tricky). Once you start taking backgrounds into account, keeping it in the window and avoiding window violations become even more important, so just bear this in mind. I’ve mentioned this in later posts.
If you need any help viewing the images in 3-D on your smartphone, please see this post.
I think it’s important though to mention that making your own 3-D images should be fun, don’t feel you have to get too technical too quickly.
For inspiration please check out the hashtag #3DSteroidPro on Instagram.
I hope you enjoy making your own stereoviews, please feel free to get in touch through the contact page if you need any help.

Copyright © The Stereoscopy Blog. All rights reserved.

14 thoughts on “How to Make Your Own Android Smartphone Stereoscopic (3-D) Photos: Basic Tutorial”