

Updated 06/06/2020 to include the newly updated cropping and border options.
You don’t need expensive cameras or software to make your own stereoscopic 3-D images, and it’s relatively quick and easy. There’s currently a real buzz on social media with people making their own stereoviews with smartphones and sharing them, especially on Instagram, so this tutorial will be keeping this in mind.
The easiest way to make a stereoview with an iPhone is by using the phone’s camera to take two images sequentially and using an app to align and save them as a stereo-image. You can also use this app to edit 3-D photos taken with the QooCam EGO camera.
I’m using the iPhone version for this tutorial but you can find the Android version here.
There are lots of apps available, but I find one of the best and easiest to use is called ‘i3DSteroid’ for iPhones. A free version is available called ‘i3DSteroidBasic’, however, it doesn’t allow you to save the images. The full version of i3DSteroid costs £2.99 in the Apple Store, so it’s not too expensive. A free alternative app is ‘CrossCam’, which does not have the complete functionality of i3DSteroid, but has full instructions inside the app.

TAKING STEREO-PHOTOS
When first opening the i3DSteroid app, you’ll see the following screen:
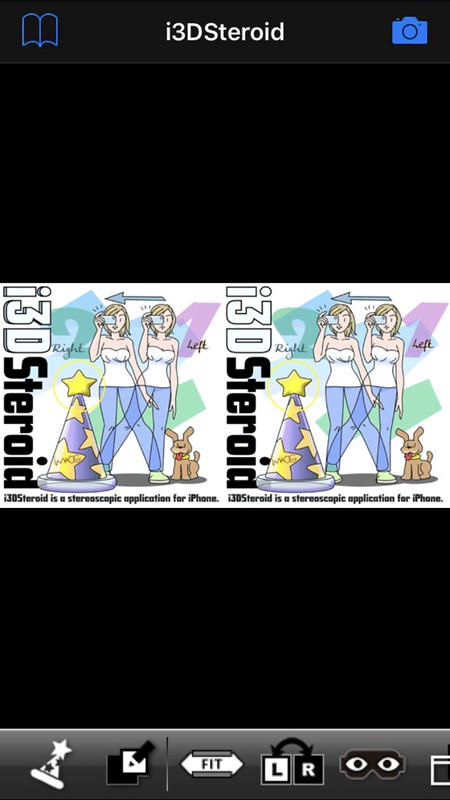
When you press on the camera icon (top right) you’ll see that you can take photos in landscape or portrait format by turning the phone. To post images on Instagram, the portrait format is usually used; for a photo-sharing platform, however, this isn’t really the best way to show the depth and quality of your stereoviews as Instagram prefers small and square images (but I’m sticking with it so I can hang out with the cool 3-D kids). For other ways of displaying the stereoviews, such as viewing the images on a 3-D TV or by projection, the landscape format can be used and is preferable. Landscape images can also be cropped later to change the format.

As I prefer to view and save my images in the parallel-view format I always take the left image first. Other people prefer the cross-view format so you could take the right image first, however, it’s not essential as you can swap the left and right images later anyway.
Once the first image is taken, you’ll see a ghost of it whilst taking the second image. This is to help with alignment and to see the separation of the images.
MAKING IMAGES COMFORTABLE TO VIEW
The general rule of thumb for comfortable 3-D viewing is to move from left to right 1/30th of the distance between you and the subject to avoid excessive background deviation. For close subjects this movement can be a minute amount (e.g. 0.5cm for an object 15cm away), but Instagram and iPhone screens are quite forgiving as the images are so small. If the image is projected, however, a big deviation can be too much for the brain to fuse, or be extremely uncomfortable to view. Try to keep in mind what your eventual aim for the stereoview is; what works well on a small screen doesn’t always work for projection when the image is much enlarged. Move too little, however, and there will be very little depth. Seeing as we’re using digital images, you can always experiment to find how much 3-D depth you prefer by moving different distances.
Sometimes exaggerating the depth (also called making a hyperstereo) actually looks better up to a point. Again though, keep in mind that if you want to use these images at a later date to print as a card or to project they may not be suitable as the deviation is too much for your noggin to fuse.
If you’re taking an image of a particular subject, keep an eye on anything that is too close to you in the foreground which may ruin your stereoview. It may cause it to have too much deviation between the two images, and the usual suspects are tree branches, plants or friendly cats. Sometimes this can be cropped or cloned out later.
Try to also keep the camera as level as possible, both horizontally and vertically, between the two photos. Moving slightly closer, or skewing the camera, between shots can sometimes cause a stereoview to be unusable, but you will find this with practice. It’s all a learning curve so don’t feel you fail because you can’t use every image, you have to expect it.
THE CHA-CHA METHOD
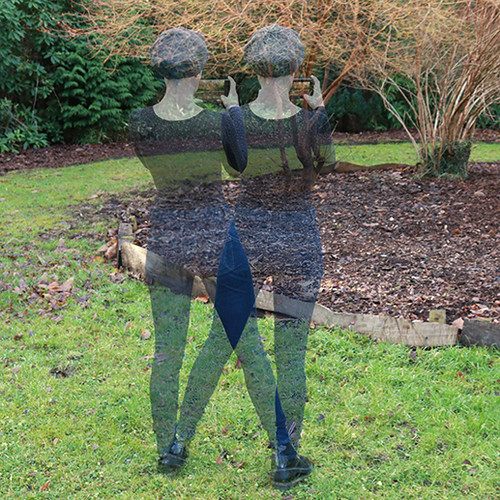
If you’re taking a stereoview of a more distant object, such as a building, tree, etc., people recommend a rocking method called the cha-cha method, see the image above (I’m not really a ghost BTW). This involves standing with your feet slightly apart, but well balanced, and your elbows tight to your sides, with the camera held in the middle. You move your weight to your left foot, so the camera is on the left, to take the first photo. You then transfer the weight to your right foot, which will also move the camera to the right, allowing you to take the second photo. Personally, I don’t do this; instead I try and judge the distance and move the camera accordingly. You can, however, bust some cha-cha moves if you want, all in the name of 3-D. Again, remember to check for anything in the foreground that may be too close for the distance you’re moving. Also check when people, vehicles, clouds, animals, etc. are in shot for movement. This can be very distracting when trying to fuse two images showing different movements into one 3-D image, it can, however, also be the look you’re going for. Have you ever tried to tell an awake cat or small child to stand still though?! As I mentioned before, also try and keep the camera as level as possible between shots; if you find this difficult you can buy a sliding bar.
AUTOMATICALLY ALIGNING YOUR IMAGES
Now you have the two images to make a stereoview. The app is usually set by default to automatically align the images as soon as they are taken (this can be changed in the settings), however, you can also press the wizard hat icon (bottom left) to adjust them, and the app will tell you the deviation.

Now you have your aligned stereopair. Congratulations! If you can free-view stereoviews, or if you have a stereoscope, the left eye image will be on the left side and the right eye image will be on the right side. The London Stereoscopic Company’s OWL viewers work well with smartphones to see parallel-stereoviews, especially the VR Kit with a magnetic plate to hold your phone. Lots of other viewers tend to over-magnify and make you feel a little sick.
If you’re a natural cross-viewer you can click on the ‘swap LR’ icon and the app will swap the left and right images. Now you can look on-point as you go cross-eyed at your phone.
MANUALLY ALIGNING YOUR IMAGES
If you’re unhappy with the automatic alignment, you can also manually align them by pressing the edit icon (2nd icon in from the bottom left), which will take you to the following screen:
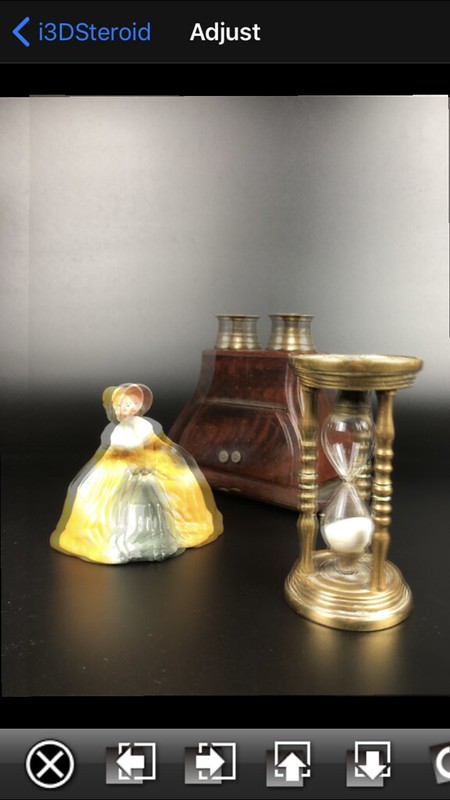
You can press and move your finger across the screen, or press the arrow keys, which will move the right image (if you’re using the parallel-view format), and you can align it to your heart’s content. See above for the general rules about aligning the two images to make a 3-D image comfortable to view. If you also want to ‘keep it in the stereo window’ please see this tutorial. I aligned this stereoview manually by ensuring the closest part of the image, the top of the sand glass, was perfectly aligned in both images.
You may now decide to crop your image and the new version of i3DSteroid allows this (03/03/2020), see below for the tutorial.
SAVING IMAGES
If you’re happy with the image you can save it as a stereoview to your phone by clicking on the ‘Menu’ tab (top left book icon), then on Save Stereo image:
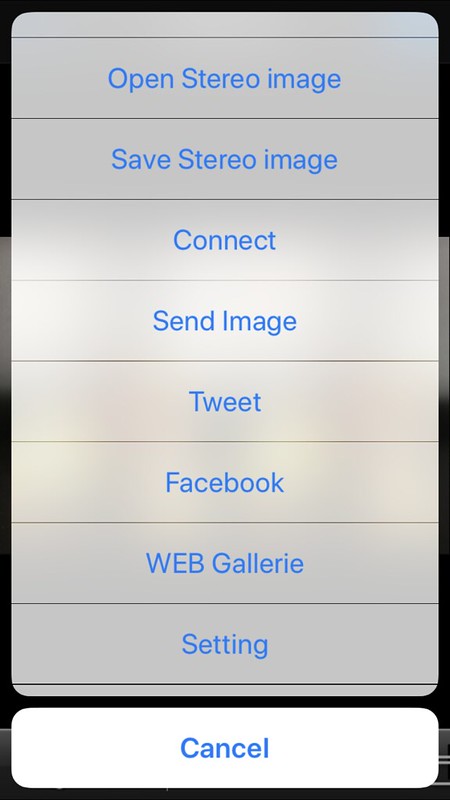
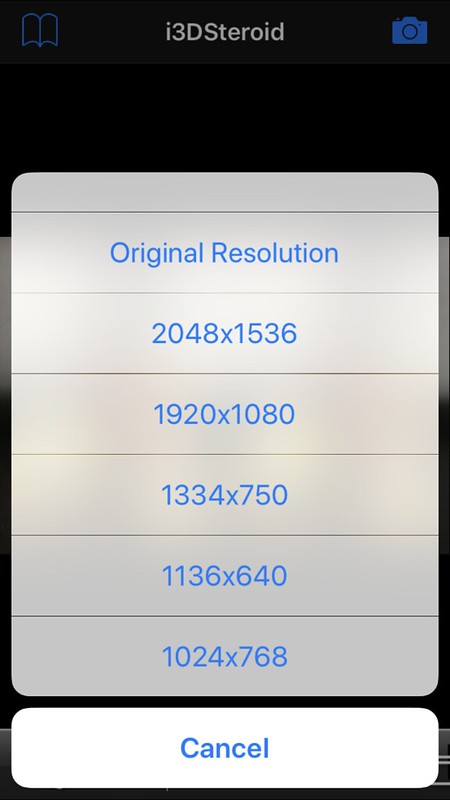
You’ll be offered different options to save the image; I tend to save mine with the highest resolution possible in case I want to project it at some point.
The file is now saved as a stereopair in your gallery and from there can be uploaded to Instagram.

CROSS-VIEW AND ANAGLYPH
If you decide you want to save it as a cross-view too, you can simply press the swap icon, then menu and save; both views will now be saved in your gallery. You can also click on the Stereo icon (a pair of masked eyes), then Cross-eyed, ok and save to get the same result.


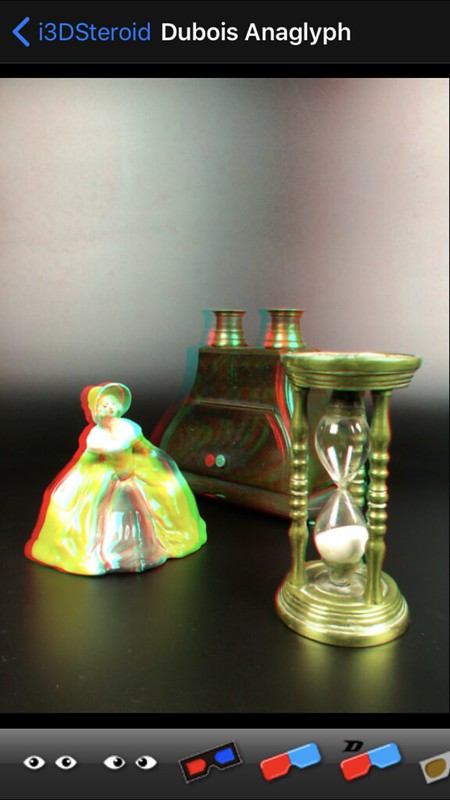
You may also decide that you wish to view and save the image as an anaglyph. Anaglyphs are a good way of showing landscape format images in 3-D because the side-by-side images usually require quite a bit of cropping, especially for Instagram. The i3DSteroid app also allows you to convert your stereoview into an anaglyph. Click on the Stereo Icon (a pair of masked eyes), make sure the stereoview is in the parallel-view format, ensuring the left and right images are on the correct sides, then click on Anaglyph.

You can also use the colour anaglyph or the Dubois colour anaglyph option (anaglyph glasses with the number 27) to keep the image in colour. I recommend trying both to find which option best suits the colours of your image the best.
OPENING IMAGES ALREADY SAVED ON YOUR PHONE
You can also import images which are already saved on your phone, such as those taken with the QooCam EGO.
This opens up the possibility of you taking many sequential images a small distance further apart each time without using the i3DSteroid app, and choosing a pair from them for the best depth and quality of 3-D image.
Open the app and click on the menu icon (the book – top left) and then Open Stereo image.

This will take you to your camera roll from where you can choose two separate single images, or one single image file consisting of a left and right view (such as the QooCam EGO files). Click on the image/images you want to align and press done.

The app settings on this iPhone are enabled to automatically align the images once they are opened in the app. This can also be done manually – see previously mentioned steps above.

And now save as before if you’re happy with the stereoview.
CROPPING YOUR IMAGES
i3DSteroid App Update 06/06/2020: You can now easily crop images to any size you want thanks to the latest update.
Click on the Edit tab (2nd icon from bottom left). This manual alignment screen now also allows you crop. Make sure both images are aligned, then move the sides of the square with a finger to your desired size. Also check for anything that might remain in just one picture and might be distracting.

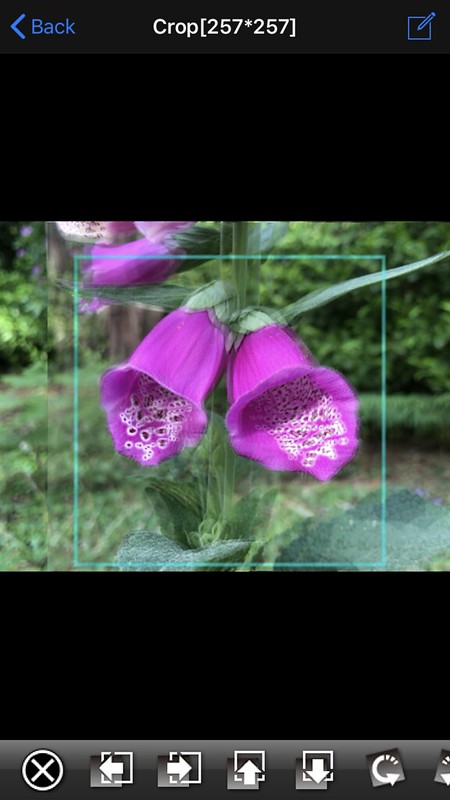
The app also gives you the option to chose a fixed ratio for the crop and I’d like to make this one square. Click on the top right Edit icon and it’ll offer you three options for cropping ratios:

I chose the 1:1 for a square and moved the square so my flowers were central in the image:
Press the back key and you’ll see the image has now been cropped.

Note that if you’re unhappy with the crop you can go back into the Edit tab and re-crop the full image. It may be worth checking the alignment again just in case anything has been cropped out of the image to which it was aligned. Save as before for your new spangly cropped stereoview.
ADDING BORDERS
UPDATED APP JUNE 2020: The new app includes extra options to format the stereoviews with borders which are fantastic for Instagram.
You click on the Stereo icon (a pair of masked eyes at the bottom of the screen). And it will now show two extra options next the the cross-view icon.

The two frames icon is for a side-by-side pair with a border and the four frames icon will display the stereoview as a parallel pair at the top and a cross-view at the bottom, all with a lovely, lovely border.

To edit this border click on the Edit icon (top right) and it will bring up the border settings options:

The border width changes the border size around the stereoview as well as in between the images. The round corner changes the amount of curving at the edges. As my image is square and the flowers are central I wanted to make a circular border so I increased the Round Corner to 50%. The new app also allows you to change the colour of the border to match the image so I clicked on an area of the thumbnail image to choose the colour:

I pressed OK and it displayed the image in the side-by-side parallel-view format with the new border settings:

As people can usually naturally free-view either in parallel- or cross-view I changed the frame to the four-square option to display my image as a parallel-view at the top and a cross-view at the bottom, here to please everyone!

And now all that is left is to save your image as before and share it on Instagram! Congratulations on making a parallel/cross-view stereoview with a coloured, rounded border!

Please note the images I’ve taken for this tutorial are very simple. Once you start taking backgrounds into account, keeping it in the stereo-window and avoiding window violations become even more important so just bear this in mind. I think it’s important though to emphasise that making your own 3-D images is enjoyable, don’t feel you have to get too technical immediately.
The images I took for this tutorial are not the best quality as I found it quite tricky trying to take photos whilst making screenshots, so please check the hashtag #i3DSteroid on Instagram for inspiration.
If you need any help viewing the images in 3-D on your smartphone, please see this post.
I hope you have fun making your own stereoviews, please feel free to get in touch through the contact page if you need any help.

Copyright © The Stereoscopy Blog. All rights reserved.

A very good tutorial. The only thing that seems to be missing is an indication of how much deviation between the two images in a stereo pair is too much. On the Photo-3D discussion list, George Themelis recommends aiming for between 2 and 2.5% deviation.
LikeLike
Hey Rob! The 1/30th distance rule is loosely based on this for comfortable 3-D depth. Dr. T wrote a great guide on it, and how to measure it: http://drt3d.blogspot.com/2015/10/how-to-measure-stereoscopic-deviation.html I guess ultimately it depends on what you want to do with the 3-D images – if you’re going to project them or view them on a large screen, then the deviation really matters, but if it’s for stereocard-format or just viewing straight on your phone, then a little more deviation won’t be so harsh on the brain for it to fuse.
LikeLike
Many thanks for your reply, Rebecca. As you suggest, Dr. T’s guide to measuring stereoscopic deviation to achieve comfortable 3D image viewing is well worth reading.
LikeLike