

I’m really happy to welcome to the Stereoscopy Blog Sroyon Mukherjee, a talented amateur photographer from India, who I’m proud to say has recently started seriously getting into stereo photography. His mono film camera photos and darkroom skills have really blown me away, so I was excited when he asked me to help him with stereo-photography, and I can’t wait to see the results. He is an inspiration and a great help with analogue photography; you can find his excellent articles on 35mmc here.
In his first post, he describes how he started to free-view stereoscopic images and why others should try too. My personal first experience of being told I absolutely had to free-view (it’s not vital!) was several years ago, with an intimidating person on either shoulder, trying to force me to parallel-view. Not the best way to coax a shy person to relax their eyes! I wish I had this article, advice and real encouragement back then.
Thank you Sroyon 🙂

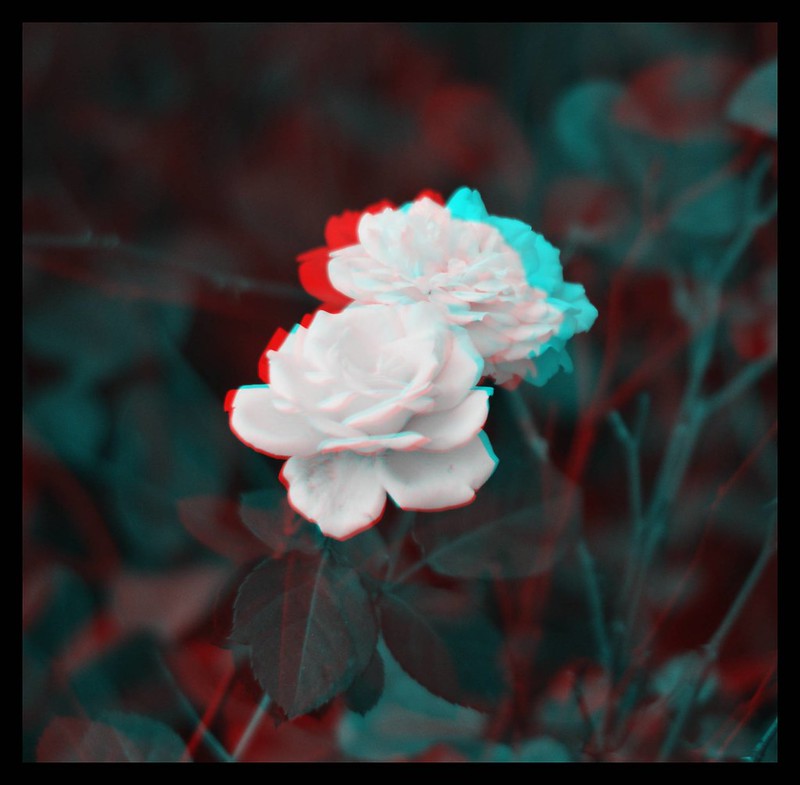
The image above is a ‘stereo pair’ – two photographs shot from slightly different perspectives, presented side by side. When viewed through a device known as a stereoscope, the two images merge into a single, three-dimensional image. ‘Free-viewing’ is being able to do the same thing with the naked eye. It’s a way to look at a stereo pair so that it appears 3D, with certain details seeming to ‘sit behind’ or ‘pop out of’ the screen. The effect, if you can pull it off, is truly magical.
The first part of this post is about why I love free-viewing. The second part is about learning to free-view – how I learned, and how (hopefully!) you can learn too.
Since this is a stereoscopy blog, I’m guessing quite a few readers can free-view already. For them, this post may not have much to offer – maybe just a trip down memory lane as you recall when and how you first learned the skill, or even a renewed appreciation of your ‘superpower’.
But some readers, perhaps, are new to stereoscopy, or haven’t yet learned to free-view. I’m a beginner myself; I got into stereoscopy (and learned to free-view) about two months ago. So, while I have no deep insights or knowledge to share, the experience of learning to free-view is still fresh in my memory, as is the joy and wonder of it. If you don’t already know how to free-view, hopefully this post will motivate you to try. Because the rewards, in my opinion, are well worth it!
1. Why I love free-viewing
So what are these rewards? If you’re already sold on the idea of free-viewing and just want to learn how, feel free to skip to the next section. But if you’re still on the fence, here’s the lowdown on why I love free-viewing.
First off, let’s talk about the alternatives (just an overview; Rebecca has a more detailed post on different ways to view 3D images). There are three common ways to present stereo (3D) images online. Wigglegrams, like the GIF below, can be viewed without special viewers or glasses, and potentially also by stereoblind people (funnily enough, I find they look slightly more 3D when I view them with one eye closed). They produce an illusion of depth, but they are not as realistic as ‘true’ stereo images.

Wigglegram of a street in Cork, Ireland (1927). Wikimedia Commons, public domain
Anaglyphs are designed to be viewed through special glasses which have a different colour filter for each eye (the image below is the most common format, designed to be viewed through red/blue glasses). Anaglyphs produce a ‘true’ stereo effect – parts of the image appear to ‘sit behind’ or ‘pop out of’ the screen. Also, red/blue glasses are cheap and widely available. But the technology has an inherent limitation – the colour rendition is not the best.
Stereo pairs, in my experience, have vastly superior quality. I was used to seeing anaglyphs – I’m interested in astronomy, and agencies like NASA and ESA occasionally publish anaglyphs on their website – but the first time I saw a high-quality stereo pair in 3D, it blew my mind. The colours, textures and light look incredibly realistic. It literally has to be seen to be believed.

Stereo pair displayed on my phone, which is placed in a stereo viewer
Stereo pairs can be viewed with stereoscopes, also known as stereo viewers. These devices are inexpensive, small and light. With a stereoscope, most people can see the 3D effect instantly (as opposed to free-viewing, which takes a bit of effort to learn). So why should you bother at all? Personally, I prefer free-viewing for three reasons.
First, it’s convenient. Sometimes, lying in bed and scrolling through Instagram as one does, I might come across a stereo pair. Do I then have the motivation to get up and fetch my stereoscope? No sir. But if you can free-view, you can look at stereo images anytime, anywhere.
Second, image quality. Stereoscopes are already a vast improvement over anaglyphs, but free-viewing, in my experience, is even better. Almost all lenses produce minor aberrations like distortion and colour fringing. Free-viewing offers a direct, unmediated viewing experience with no degradation whatsoever.
The third reason, for me, is simply that free-viewing feels cool. I like the minimalist aspect, that no gadgets or optical aids are needed. It’s mind over matter – two eyes, unaided, looking at two different images, and the brain fusing them into one. In a sense, free-viewing is like a superpower – looking at an image and literally being able to see a different dimension. Admittedly an obscure superpower, with limited practical application. But on the plus side, unlike laser-vision or flying, it’s one that most people can learn.
Perhaps there are more philosophical reasons too. Luke Mitchell, in an article for the New York Times, wrote that free-viewing ‘is best appreciated as a different way to think’. For Mitchell’s stereo-enthusiast father, it was ‘a kind of practice, a way to hold two ideas in mind that were, if not opposed, then at least divergent.’ ‘Seeing in stereo,’ he says, ‘was a way to think in stereo.’
But we need not go as far as that; for me, the practical reasons are enough. Free-viewing offers an instant, easy way to view stereo pairs. It needs no accessories, and offers, in my experience, the best way to view 3D images on a phone or computer screen. And that’s why I think it’s worth learning – if you can!
2. Learning to free-view
Although I’ve known about the concept of free-viewing for several years, I somehow always assumed that it was a rare skill, difficult or impossible for me to master. But I recently got into stereo photography (as recounted in my recent article for 35mmc), and under the spell of my new interest, I thought I’d give free-viewing a try. Much to my own surprise, I learned in about 20 minutes.
Free-viewing, I think, is a bit like learning to ride a bike. It seems like it can’t work, until you learn how to do it. And once you learn, it opens up a world of possibilities.
When learning to free-view, I found it helpful to know a bit of the theory, just to understand what’s going on. Stereo photos are shot from two slightly different perspectives, mimicking how our two eyes see the world. Say you take a photo with an ordinary camera, or even your phone. Then move your camera a few centimetres to the right and take another photo. Let’s call the two photos L and R.
Ordinarily, at any given moment, both our eyes would be looking at either L or R. The 3D effect is created when our left eye is looking at L, and our right eye at R. There are two ways to do this: parallel view and cross-eye view:
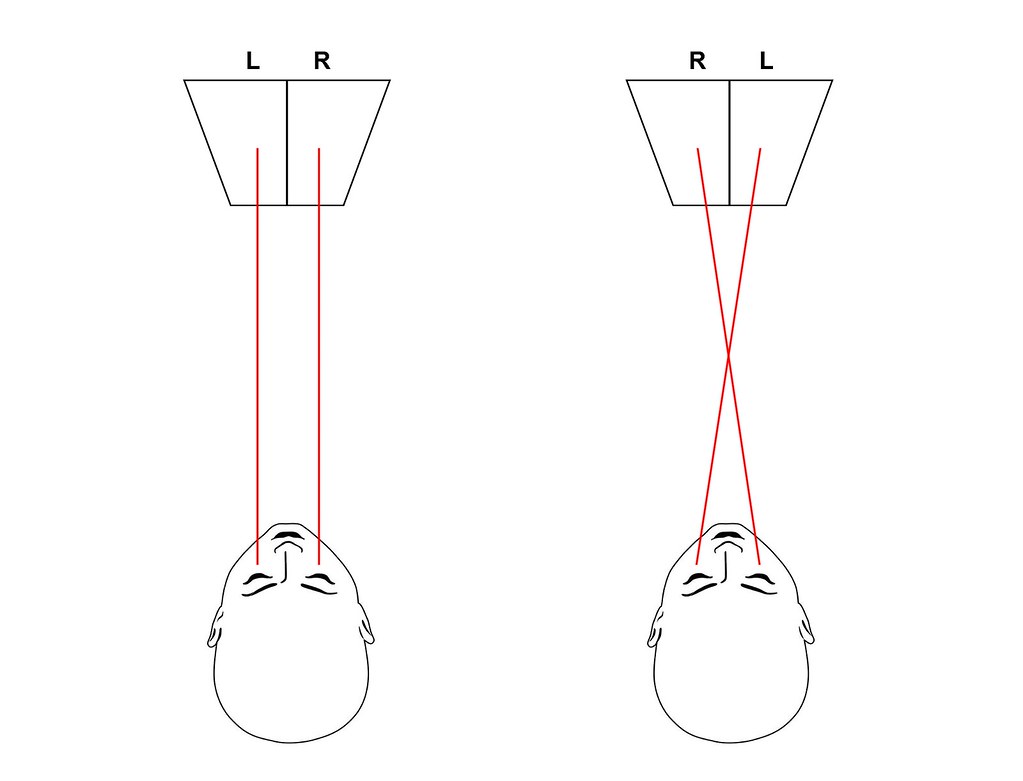
Note that for cross-eye viewing, the L and R images must be interchanged. If you parallel view an image meant for cross-eye viewing (or vice versa), the depth is reversed.
3. Parallel versus cross-eye
Parallel viewing comes more naturally to some people, while others prefer cross-eye. Some can only do one, while others can do both. I learned parallel viewing first, and for a while I couldn’t do cross-eye. I thought maybe cross-eye was not for me. And maybe I just didn’t try hard enough; having learned one free-view method already, I had less motivation to learn another.
Anyhow, after a few weeks I made a more determined effort to learn cross-eye viewing. Again, I learned in about 20 minutes.
So which method should you learn? My suggestion: whatever is easier! Try both, and if you can learn any either of the two methods, you are already at an advantage. If you can do both, even better. And if you can’t do either, don’t be too disappointed. Not everyone can. Stereoscopes are an easy, inexpensive way to view stereo pairs, and you still get very good quality.
I was curious to know which method is more common, so I did an informal poll in a Stereoscopy Facebook Group I’m in:

Bear in mind this is a stereoscopy group, so the results are somewhat skewed. But it seems like parallel view is more common on the whole. Among the lucky ones who can do both, some prefer parallel (one person said it’s ‘more relaxing, as if meditating’) while others prefer cross-eye (‘parallel gives me a headache’). Clearly it’s a very individual thing!
In general, cross-eye viewing is easier for large images (such as a full-screen stereo pair on a computer monitor), and parallel is easier for smaller images (perfect for phone screens). Vintage stereo cards are typically in parallel format, as are the majority of stereo images shared online. But some people share cross-eye images only, and some people helpfully share both.
Next up, I’ll describe how I learned, and offer a few tips. Obviously, my experiences are not universal; everyone has a different way of learning. And it’s not a contest – it doesn’t matter if it takes you five minutes to learn, or five years. One participant in my Facebook poll said they could do cross-eye from age ten, but it took them another 40 years to parallel. The most important thing is to have fun!
4. General tips: both methods
When we look at an object, our eyes do two things simultaneously: converge on the object and focus on it. Convergence ensures that we see one object, not two. Focus ensures that it looks sharp, not blurry.
For parallel view, our eyes have to focus on the screen which is nearby, but converge on a point in the distance (beyond the screen). In this state, our pupils are less converged (further apart) than they would be if we were looking at the screen normally.
Cross-eye view is the opposite: our eyes focus on the screen, but converge on a point which is closer (between our eyes and the screen). Our pupils are more converged (closer together) than they would be if we were looking at the screen normally.
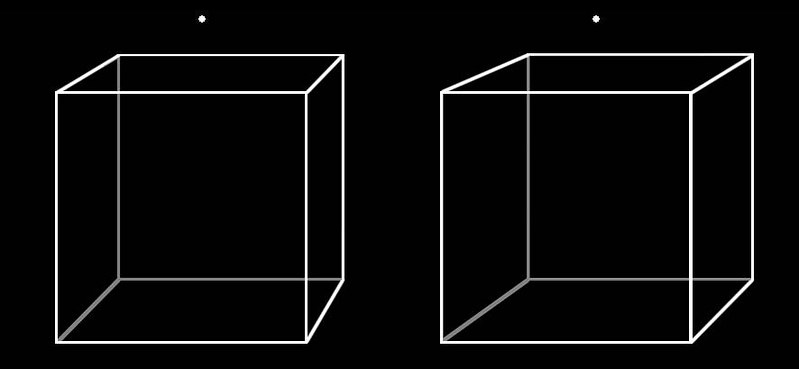
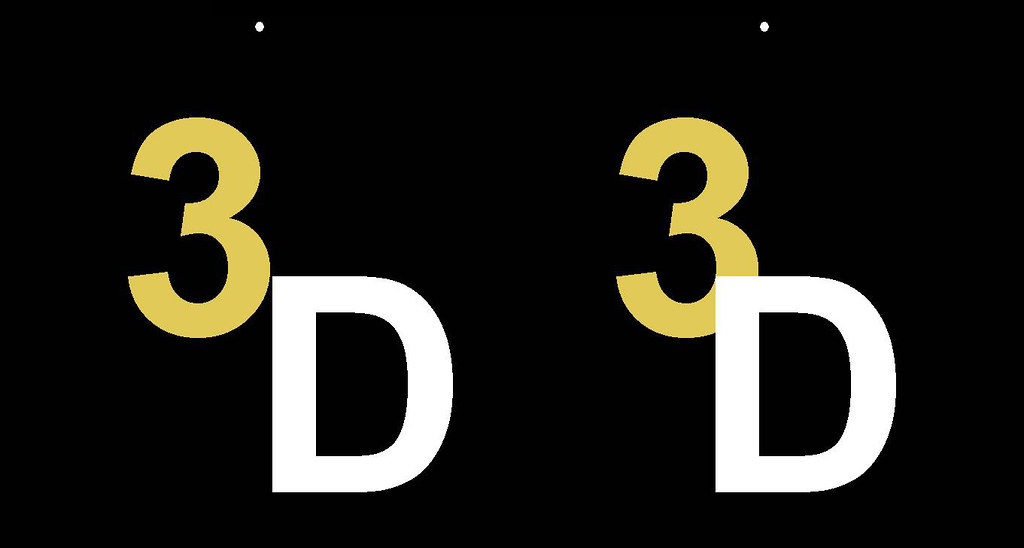
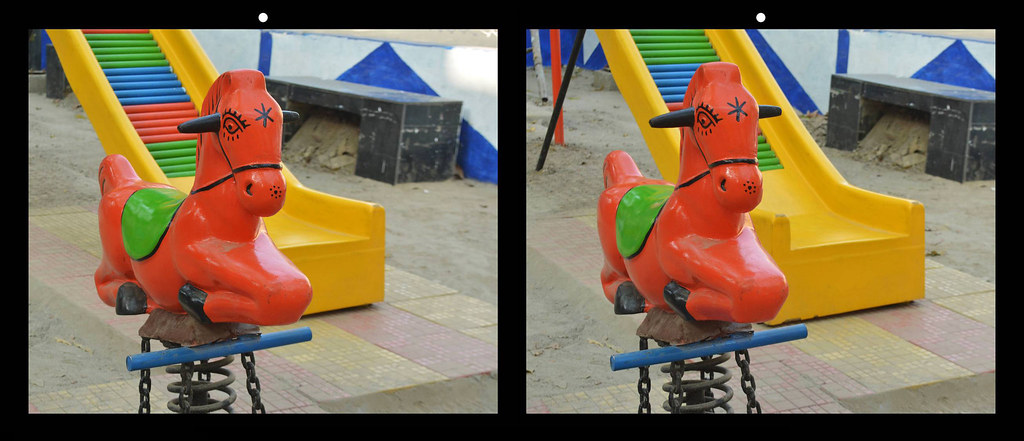
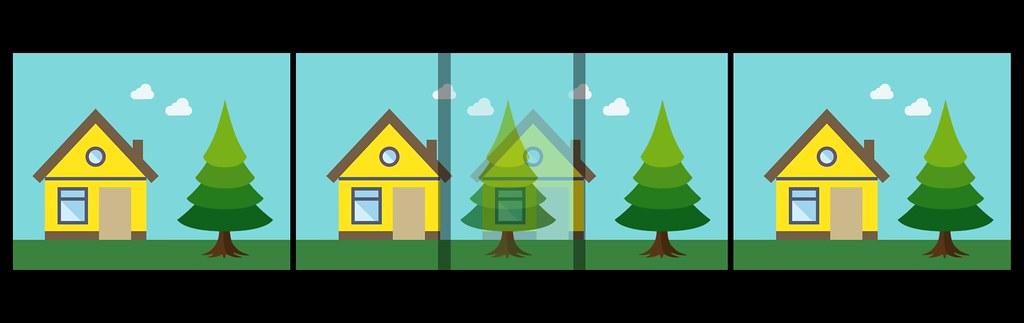
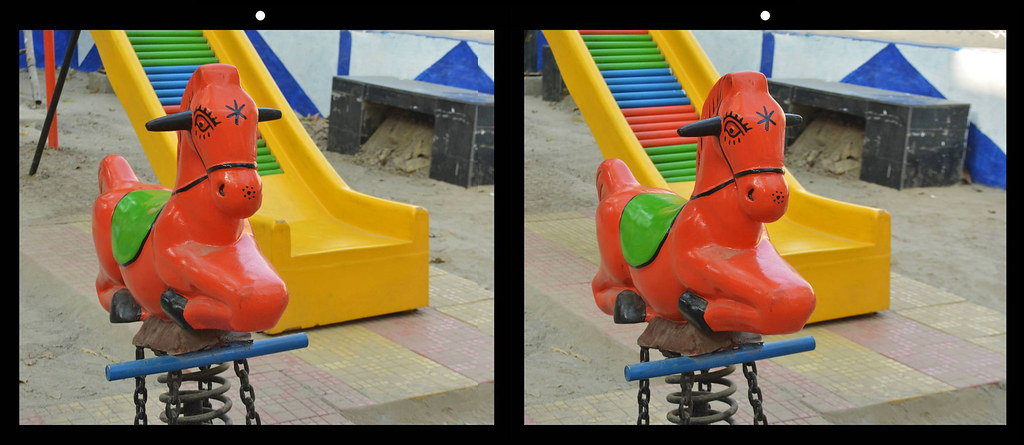
I’ve provided four stereo images for practice: three graphics and a real photo. I learned from a real photo, but some people find it easier to learn from graphics with simpler shapes and colours. Feel free to try them all and see what works for you.
For both methods, it’s easier if you try on a computer because the larger screen offers more flexibility (once you’ve learned, you can free-view on a phone screen, physical print, and many other media). If you normally wear glasses for looking at a computer screen, keep them on.
I recommend opening the image in a new tab (right-click, open image in new tab), and maybe switch to full-screen (F11 or Ctrl+Cmd+F). That way, you can see the image against a clean background with minimal distractions, and also zoom in or out to adjust the image size (scroll while holding Ctrl or Cmnd).
If you feel eye-strain or discomfort, take a break or try another day. If it doesn’t work right away, don’t worry. Some people take years to learn, and some can’t do it at all. In the larger scheme of things, it hardly matters.
5. Parallel view
Hold up one finger at arm’s length, and look past your finger at something on the far side of the room. You should see a double image of your finger. That’s because your eyes are converged not on your finger, but on the far side of the room. We will be using the same trick for parallel view.
I will describe two different methods for learning to parallel view: septum method and prop-less method. The prop-less method is how I learned, but I believe the septum method – which I did not know of at the time – is easier. You can practise with the images below.

Septum method
You will need a piece of stiff paper or card, approximately 8″×5″ (20×12 cm). You can also fold an ordinary A4 paper in half, but stiffer paper or card works better.
The three images above are all in parallel view format. Open one of them in a new tab, and zoom out so that the image is about 5″ (12 cm) wide. A little bigger or smaller is fine too.
Hold your paper perpendicular to the screen, aligning the short edge of the paper against the central divide of the stereo pair. Holding the paper in place, touch your nose to the opposite edge. Now if you close your left (or right) eye, you should only be able to see the R (or L) image.

Close one eye – any eye – and look at one half of the stereo pair. Relax your eyes, as if you’re looking at something distant. Now open your other eye. If you’re lucky, you’ll see a 3D image instantly. More likely, you’ll see a sort of double image – two overlapping 2D images. Without moving the paper or your head (your nose should still be touching the edge), try to ‘fuse’ the two images. Eventually, they will drift or snap together, and you will see the image in glorious 3D. When it works, you’ll know!
Eventually, you will – hopefully! – get the hang of it, and be able to do it without using paper as an aid. But if it doesn’t work right away, don’t give up. Make the onscreen image bigger or smaller, try a different image, or rest your eyes for a bit and try again. Or try the prop-less method, which is how I learned parallel view.
Prop-less method
Open one of the practice images in a new tab, and zoom out so that the image is about 5″ (12 cm) wide. A little bigger or smaller is fine too. Look at the screen from a normal distance, about 15″ (40 cm) away, but relax your eyes – as if you’re looking beyond the screen and into the distance. This causes your pupils to diverge. On your screen, you should see four images, not two – something like the simulated image shown below.
With your eyes still ‘gazing into the distance’, try to bring the onscreen images into focus. If the four images recombine into two, it means your pupils have converged on the screen; you’re looking at the image ‘normally’. No big deal; it’s normal. Deep breath, try again.
When you can see four in-focus images, consciously try to ‘bring’ the middle two together. I find that it often helps to concentrate on a prominent part of the image.
If it doesn’t work, try different things. In the method I just described, you focus first and then try to fuse the middle two images. Some people prefer the opposite: fuse first and focus later.
There are yet more things you can try. Try a different image. Change the browser magnification to make the image bigger or smaller. Move a bit further from (or closer to) the screen. Tilt your head to the right or left. Close your eyes for a bit and open them again. Take a break. If you still can’t get the hang of it, try the cross-eye method.
6. Cross-eye view


Finger method
Open one of the practice images in a new tab. Zoom in (or out) so that the image is about 10″ (25 cm) wide. A little bigger or smaller is fine too. Look at the screen from a normal distance, about 15″ (40 cm) away.
Hold one finger in front of your nose, about 4″ (10 cm) away. Close your left eye and look at your finger with your right. It should point somewhere on the left half of the pair (which is actually the R image – remember, cross-eye images are flipped!) Note where your finger is pointing to.
Now without moving your finger, close your right eye and look at your finger with your left. Your finger should point approximately at the same spot, but on the right half of the pair. If it doesn’t, move your finger as needed – closer, further away, or to the side – until it points to the same spot when seen with each eye individually.

Simulation of the finger method, but using a pencil. Not how in both views, it’s pointing to the base of the tree.
Now open both eyes and look at your finger. On your screen, you should see a triple image (actually four images, but the middle two should have fused into one). Keep looking at your finger (this ensures that your eyes converge on your finger), but concentrate on the middle image onscreen, and try to bring it into focus. If you see a double-image of your finger, your eyes have converged on the screen. No big deal; it’s normal. Deep breath, try again.
Eventually, you will – hopefully! – get the hang of it, and be able to do it without using your finger as an aid.
Prop-less method
I won’t describe this in detail, as this is essentially the cross-eye version of the prop-less parallel method described earlier. Simply open one of the practice images in a new tab, so that it’s about 10″ (25 cm) wide, and look at the screen from about 15″ (40 cm) away (compared to parallel view, cross-eye is easier with larger images and an increased viewing distance).
Now try to converge your pupils so that you’re looking at a point close to your nose, but focus on the screen. You’ll see four (possibly out-of-focus) images at first. But with practice, you can fuse the middle two into a single, in-focus 3D image.
If it doesn’t work, try a different image. Change the browser magnification to make the image bigger or smaller. Move a bit further from (or closer to) the screen. Tilt your head to the right or left. Close your eyes for a bit and open them again. Take a break. Or else, try the finger method described earlier; I personally find it easier if my eyes have something to converge on.
7. Final thoughts
I hope this post will encourage you to learn free-viewing. Maybe you’ll pick it up immediately, or maybe it will take you a while. But once you learn, you won’t forget, and like most things, it gets easier with practice. I learned less than two months ago, and I can already snap into ‘free-view mode’ almost instantly. But if you can’t get the hang of it, don’t worry – not everyone can! Just get a stereoscope, and the (stereo) world is your oyster.
Sroyon
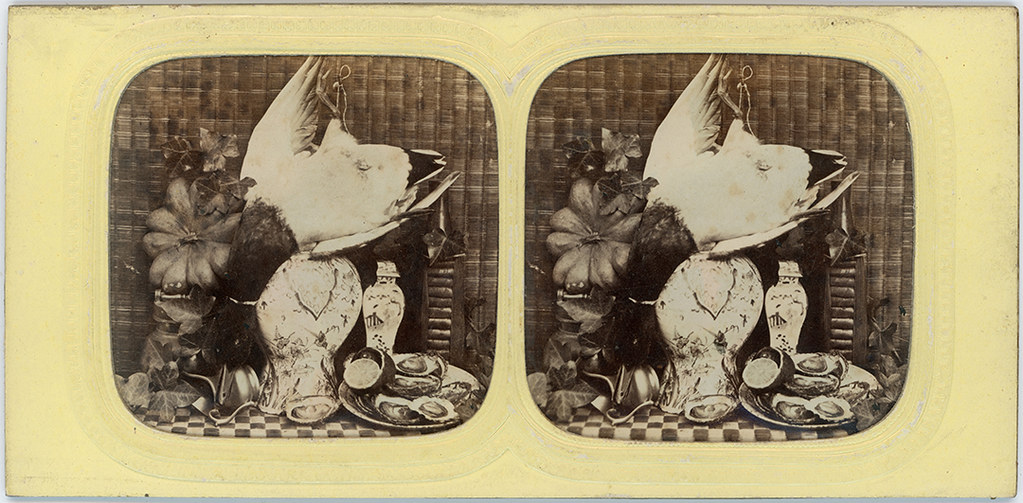
Random c1860s stereoview, still life featuring oysters, untitled, unknown photographer. Collection: D. Pellerin

Copyright © The Stereoscopy Blog. All rights reserved.

8 thoughts on “Learning to Free-View: See Stereoscopic Images with the Naked Eye”