

By Andrew Lauren
The Road Less Traveled
My journey doing stereoscopic photography began on the water in May 2014 – on a boat on London’s
Regent’s Canal to be exact. Of course I was taking pictures. For me, taking pictures meant shooting with my DSLR. That’s the important detail for why I do stereoscopic photography the way I do it and how. For decades, I had either used an SLR with film or a DSLR. My photographic tools and expectations were grounded in those kinds of cameras.
During that canal boat trip, I saw someone else photographing with a DSLR like mine, except his set-up had what looked like a pair of binoculars attached to it instead of a conventional lens. When I asked him about it he said he was shooting in 3D and the attachment was made by a company called Loreo. It had never occurred to me that doing 3D photography was a possibility. By itself, that would not have been enough to spur me to begin doing stereoscopic photography. But, it occurred at an opportune time. I was interested in exploring the multimedia storytelling capabilities that the newly created iPads had opened up with eBooks. The immersiveness of the stereophotographs that my travel companion on that canal boat described seemed complementary to where I was heading creatively.
And so began my stereophotography – with a DSLR and the Loreo attachment for it. I didn’t know anyone else who did this type of photography. I didn’t know of any organizations for it. I enjoyed ViewMasters as a kid but they had not had a significant impact on me. This was also before Brian May began to widely share his love of stereophotography on social media and the resulting explosion of smart phone stereoimages on Instagram by those who are Queen fans.
Building a 2-camera stereo rig so that its Two Hearts Beat As One
Every journey begins with that first step out your door. You may not realize at first that you have started on a journey. Beginnings, and turning points that mark a fork in the road in your life, may only become obvious in retrospect. But, where you wind up can be strongly affected by where you start. My stereophotography journey began with a DSLR and a Loreo image- splitter attached to it. I was unaware of any other way to do stereophotography. Almost immediately after I began using the Loreo system its limitations became obvious. The most significant was that its splitting of an image into two narrow portrait-oriented versions was too restrictive creatively for my compositional wants and needs.

I decided that I would need to buy a matching DSLR to the one I owned and figure out a way to hold them together and fire them off simultaneously. I had used mechanical shutter releases as far back as my film camera days. I assumed it would be an easy thing to find a splitter for shutter releases that would allow me to fire off two cameras with a single press of a button. I was wrong.
Unable to find shutter release splitter I tried proceeding with shutter releases connected to each camera. When I was ready to take my photo I would push the two shutter release buttons simultaneously (hopefully). That turned out to be more challenging than I expected. The shortcomings of what I was doing soon became clear when I took a picture of a bicyclist crossing in front of me. The shutters of the two cameras sounded like they had fired simultaneously. When I looked at the resulting images from the left and right cameras I saw that they hadn’t. They were nearly identical but the bicycle pedal positions in the left and right images were slightly different. The two cameras had not fired off simultaneously though, to my ear, they sounded like they had. Nearly simultaneous was not good enough for me. I found this result frustrating, unacceptable and a compromise I was not willing to make to do stereophotography. My thinking going into this had always been that if I was going to do stereophotography it would have to meet the same standard of excellence that I had for my 2D photography.
I was still trying to learn this skill on my own. I knew of no one else who did stereophotography and, as far as I knew, no one else was photographing in the way I wanted to do stereophotography.
This is when I got very, very lucky.
While searching online for shutter release options that could fire off two cameras simultaneously I discovered a system that seemed ideal for my needs – Vello’s Freewave system. It is a wireless system made up of a remote and a receiver, which attaches to a camera’s hot shoe. The remote connects to a specific receiver by setting a matching 4-digit code in both. By buying two sets of this system I could attach a receiver to the hot shoes of each of my DSLRs and fire them both off through the use of one remote (the two receivers and one remote all sharing the same 4-digit code).
There are other strengths to the Vello Freestyle system besides having a way to fire off two cameras with one remote:
- It is an “off the shelf” solution and can be bought through Amazon or B&H. It does NOT require specialized skills and knowledge of electronics.
- It is wireless, so the size of the stereo base is not limited by the length of a cable connecting the two cameras.
- The operating range that Vello says it has is 320 feet (97 meters). I’ve used it with as much as 20 feet (6.1 meters) separation.
- The system uses radio waves, not infrared, so you don’t have to point the remote directly at the receivers to trigger them.
When I said I got very, very lucky when I bought this system this is what I meant. Just because you have a system for connecting two cameras and firing them together that doesn’t say how close to simultaneity it does it. Nearly simultaneous synchronization is not anywhere near good enough to avoid very noticeable mismatches between the images produced by the two cameras. Vello’s Freewave is excellent in that regard and I lucked out in stumbling onto it on my own at the very beginning of my doing stereophotography.

In thinking about the creation of a two-camera stereo rig I have concluded that having an excellent synchronizing system is far and away the most important factor. This decision has to go before choosing the cameras you will use for a two-camera rig and what lenses you will use. The order of things must first be choosing an excellent synchronizing system and then finding cameras that are compatible with it (and not the other way around – having cameras and then discovering there is no way to synchronize them).
OK, now that we have a synchronization system it’s time to move on to the cameras. Here are 2 “big picture” things to keep in mind:
- Make sure the two cameras you plan to use for your rig are the same make and model. For me, the overriding factor with a two-camera stereo rig is to eliminate any and all possible sources of variability between the cameras upfront before I take any photos. I want to avoid, as much as possible, the necessity afterwards of trying to salvage a stereo pair once I get home or to hope I’ll find a software solution to rescue things. I will discuss this in detail shortly.
- Find a method of being able to identify which images are from the Left camera and which are from the Right camera. When the cameras come in different colors I consider buying distinguishing versions (e.g., I’ve bought a silver version and a black version of the cameras I have used). Stick with your decision so that the Left and Right cameras are always in these positions. I also pre-label my Memory Cards. The Memory Card that goes into the Left camera is labeled “Left” and the one that goes in the Right camera is labeled “Right”.
Why the “Why” is more important than the “What”
At this point I could provide a shopping list of “what” components are in the two different, and very effective, 2-camera stereo rigs I’ve put together – one uses Canon DSLRs and the other uses Sony mirrorless cameras. Then you, my readers, would have the information you need to re-create them on your own.
But, I’m not going to do that….. yet.
The reason is that I think the “What” I use is less important than “Why” I chose them.
A) My first 2-camera stereo rig: DSLRs
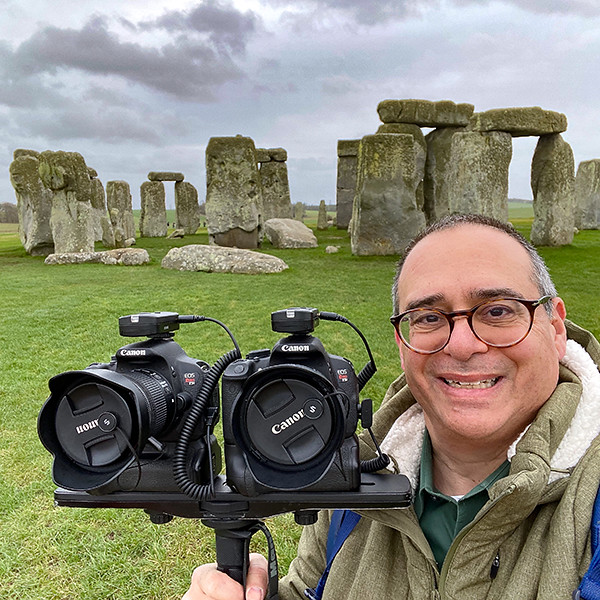
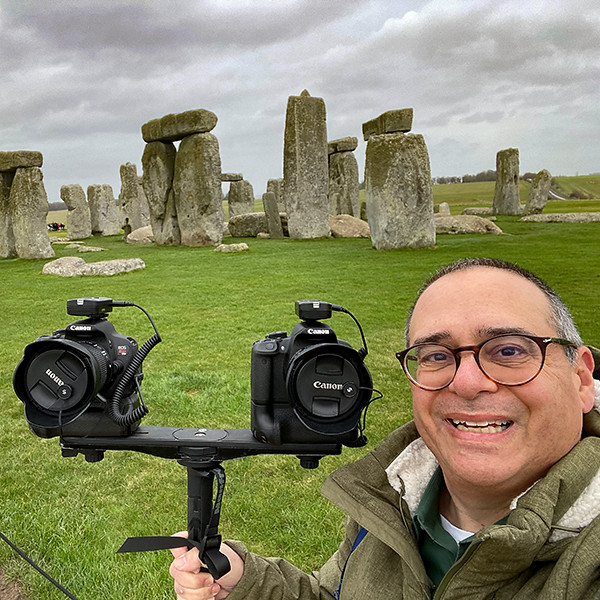
There seems to be many people who do stereophotography who also possess machining and electrical skills. As a result, I have seen many custom-built and camera-hacked stereo rigs out there. I do NOT possess those skills at all. In contrast, all of the parts of MY stereo rig are “off the shelf” stuff that I found on Amazon’s or B&H’s websites, for example.
I was shooting with a Canon DSLR when I started my stereoscopic journey and so that camera formed the starting point for my rig. Once the cameras are chosen a method is needed to physically attach them to a common surface. I went with a 2 camera mounting plate used for macro photography with slider grooves. The benefit of this set up is that it allows for the easy adjustment of the size of the stereobase (the distance between the lenses which affects how close your nearest subject can be) by being able to independently slide each camera apart from the other.
Mounting the cameras in this way results in a side-by-side “landscape” set up. After I did this with my cameras there was, at a minimum, a 5.5 inch/14cm lens separation which causes all of my images shot with this rig to be at least somewhat hyper stereo. I was fine with this. Having a near subject no closer than a car length away fit with the type of photography I was doing. The maximum separation between the lenses is 11 inches/28cm.
Initially, I attached all of this to a tripod, being sure it was a very sturdy one so as to handle the weight of the rig. I soon switched to using a monopod instead as it has a smaller “foot print” which gives much greater flexibility for where I can set up to shoot. A monopod is also much easier to travel with. This was an important factor as this 2-camera rig is quite bulky on its own without adding a sturdy tripod into the mix. An unexpected benefit of using a monopod was that it allowed me to “easily” hoist up the entire rig and leverage gaining a height perspective to add to my creative tool box. This was further facilitated by using the wireless Vello Freewave system to fire off both cameras in a synchronized way from “down below”.

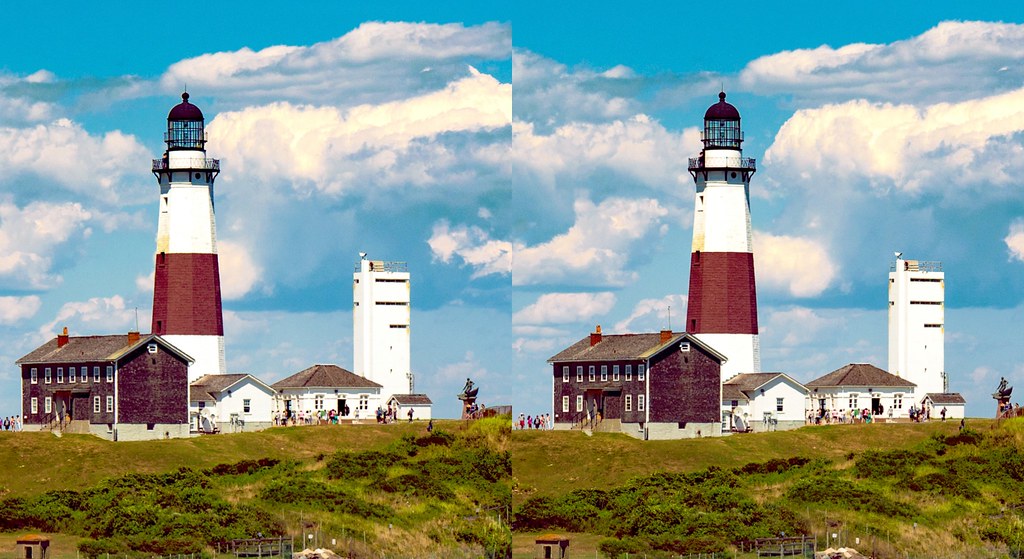
I discovered an extra benefit for using a monopod while planning to shoot a hyperstereo of the Montauk Point Lighthouse. The lighthouse was approximately 0.25 miles/0.40 kilometers away from where I was going to photograph. In order to get the stereobase I needed for the hyperstereo I mounted my left camera on a tripod and right one on the monopod. That gave me total flexibility to adjust the size of the stereobase by how far I moved with the monopod-mounted Right camera away from the Left one. With an unstable cliff to my right, and Warning signs to keep back, the farthest I could separate the cameras was approximately 20 feet/6 meters.
Now that the hardware parts of the rig are in place, it’s time to move to the actual photographing aspects.
Automatic vs Manual Shooting Settings
There’s a saying that “the left hand doesn’t know what the right hand is doing.” It is very useful to keep this saying in mind for this discussion. For almost all of my 2D photography history I had shot using Aperture Priority mode, since controlling depth of field was an important part of my creative process. The shortcoming of this approach for 2-camera stereophotography came to my attention when I noticed a difference between the left and right images of one of my shots having the same aperture settings. For some reason the two cameras had metered the scene differently resulting in a mismatch in the settings the camera employed and a difference in the appearance of the resulting images. These types of things might be fixable after the fact through software. But, it is better to avoid them in the first place.
Photographing using a camera’s Automatic features certainly has its conveniences, but those conveniences are potential traps when doing stereophotography with a 2-camera set up. Here, there are even more places where variability between the cameras can crop up creating unwanted rivalries. That is why I now use the Manual setting for the following: aperture, shutter speed, ISO, white balance and focusing. Otherwise, each camera is making these decisions independently of the other camera for these settings and independently of you the photographer and what you want. I focus manually not only to avoid mismatches between the two cameras but also to avoid another possible source of mismatching. With Autofocus the two cameras may not lock in the focus simultaneously resulting in slightly different shutter releases for them and image mismatches.
I also shoot using the RAW setting instead of JPEG. When the RAW setting is used the captured image is as the camera’s sensors detected it without any processing by the camera. While using the JPEG setting results in smaller image file sizes it does so because the camera is processing them to get there and this can result in mismatches between Left and Right camera images because the two cameras are making these decisions independently of each other.
[Mastaba photo]
Some extra thoughts
- Camera sensor size – When I shop for a camera I place great emphasis on the size of the sensor in a camera rather than emphasizing megapixel size. A larger sensor will result in a higher resolution image than that of a smaller sensor, particularly in low light situations. For example, my cameras have APS-C sized sensors. A popular stereo camera, the Fuji W3, has a 1/2.3 sized CCD sensor. The new Qoocam Ego stereocamera has a 1/2 inch CMOS sensor. The area of a APS-C sensor is more than 10 times the size of the sensors in those 2 stereo cameras explaining why rigs built around cameras with APS-C sensors are more versatile than those 2 stereocameras without taking into account the other features they possess.
- Here’s how those sensors compare in size:
- APS-C: 329-370 mm2
- 1/2.3: 28 mm2
- 1/2: 31 mm2
- Here’s how those sensors compare in size:
- Camera Display Screen
- Grid display. I like to have my camera’s display screen with the grid overlay on. I find it useful for composition reasons and as an aid to ensure my horizon is level. I also often create stereocards with square images. Having the grid allows me to compose and shoot the image in a way very close to how I will print them on a card without much cropping later.
- Histogram overlay. Often, it can be difficult to have a good idea about how an image will get captured because the display screen’s image can give a misimpression (eg bright light reflecting off of it). I add the histogram overlay to the display on one of my cameras as it gives a true indication of the lighting the camera’s sensor is “seeing.”
- Lens choice – While I have gotten good results with the “kit” lenses that come with my cameras I have generally replaced them with better lenses. When I started doing stereophotography I found that the lenses I used were coming up short as I was no longer composing to a rectangular crop but to a square one to use for my stereocards. I needed to capture more of the scene without moving farther from the subject. I most frequently use extra wide angle lenses so as to maximize my creative real estate. Also, when using higher magnification lenses there is a well-known lens compression effect that causes the background to appear closer to the foreground than it actually is. An extra-wide lens will emphasize the separation between the two and that has stereoscopic benefits.
My Current DSLR Rig Set Up
- Camera – Canon T5i. APS-C sensor
- Mounting Plate – I use a 26cm/10.2 inch 2 way macro shot focus rail slider
- Monopod – Manfrotto 290
- Method of Synchronization – Vello Freewave
- Lens I use most often – Canon 10-18mm f/4.5-5.6
My second 2-camera stereo rig: For “Street Photography”
When I decided I wanted to add spontaneous “street photography” to my stereoscopic repertoire I needed to create a new rig. While I love shooting with my DSLR rig for many reasons, it has two shortcomings from the perspective of doing spontaneous “street photography.”
- The first is that it is a heavy and bulky set up that also requires time and planning to manage all of the manual settings I described above. The weight has not been a problem for me but it is easy for me to imagine how it would be an insurmountable barrier for others. It also does not loan itself for quick and spontaneous shooting. I am a patient photographer for whom composition and choosing camera settings are important so this deliberativeness is inherent to my photography. But, the necessity of doing setting adjustments is not conducive to doing spontaneous “street photography.”
- My DLSR rig limits me to having subjects no closer than a car length away because the smallest stereobase for it is 5.5 inch/14cm lens separation.
Seeking a new creative direction gave me the opportunity to approach creating a 2-camera rig with a completely clean slate, unlike with my first rig that I built around the DSLR I already owned. I could build the new rig so that it was well suited for spontaneous “street photography.”
What was I looking for in a camera?
I was happy with the Vello Freewave system for the synchronizing so that aspect was in place.
- The camera had to be compatible with the Vello Freewave system
- It had to have an APS-C sensor
- It had to be able to shoot RAW images
- It had to have manual settings for things like aperture and shutter speed
- Most critically, I needed it to be smaller than my DSLRs to allow for a smaller stereo base
I wasn’t surprised that the first 4 items on that list would filter out many cameras. I did not expect that #5 on the list would have an outsized impact for the make up of this new rig.
When I went camera shopping I envisioned creating a duplicate rig to my existing DSLR one, but with smaller cameras that would result in a smaller stereo base. Sounds simple, right?? Though it was easy to find cameras that were much smaller than my DSLRs I kept finding that they would not produce a meaningfully smaller stereo base than my DSLR-based rig if I set them up also in a side-by-side “landscape” orientation. How could that be when the cameras were sooooooo much smaller???? On closer inspection these smaller cameras were NOT smaller on the dimension most critical to me and that would result in a smaller stereo base – the length of the cameras. Remarkably, even the smallest of these cameras had essentially the same length as my DSLRs resulting in a similar stereobase as I what I had already, thwarting my spontaneous “street photography” goal for the new rig.
This mystified me until I suspected there must be an ergonomic reason – the limitation was not technological but how small a camera would users tolerate as fitting comfortably in their hands while taking pictures.
I concluded that low-end cameras were not only unlikely to meet my essential photographic requirements they would not even provide a smaller stereo base. I then realized that another camera I already owned provided a foundation for building the new rig. I already owned a Sony mirrorless camera that was essentially identical in capabilities as my DSLRs but much smaller and lighter. Most importantly, it was compatible with the Vello Freewave system.
There’s More Than One Way Up The Mountain
I now faced an unexpected barrier to my goal of creating a 2-camera stereo rig with a smaller stereo base than my existing DSLR rig. I was not going to be able to bring the lenses closer because the camera body lengths were very similar in size to the DSLRs regardless of how small and light they were.
I could have gone in a completely different direction and chosen a sports type of camera like Go Pro which are not intended to be handheld but attached to something else. As a result, the ergonomic limitations of handheld cameras do not exist leading to even smaller camera length dimensions. However, I believed going this route would lead to trade offs I was not willing to make involving the first four considerations on my above camera characteristics list.
Setting up a 2-camera stereo rig as I had, in a side-by-side landscape orientation, is the easiest and most intuitive way to do it. However, it is not the only way.
- Overlapping – It is possible to bring the cameras closer by offsetting them so that they overlap instead of having them side-by-side. I chose not to go this route because the cameras would no longer both be the same distance to the subject and would result in perspective differences. This would introduce a mismatch in perspective between the images from the two cameras which I try to avoid, even if software could correct them.
- “Z configuration” – The lenses on my cameras are not centered on the camera bodies. They are closer to one side than the other. This characteristic can get leveraged for a different way to bring the two cameras closer together in a side-by-side set up by using a “Z configuration” (called that because of the shape of the frame to which the cameras are attached) so that one camera is attached to the mounting frame upside down. Since camera and lens heights vary a “Z configuration” frame has to be custom-made so that the camera lenses will be vertically aligned. If they aren’t, there will be an image mismatch between the two cameras. I prefer robust and versatile solutions that are ideally off-the-shelf. The “Z configuration” is the opposite of that and so I moved on to look for a different approach.
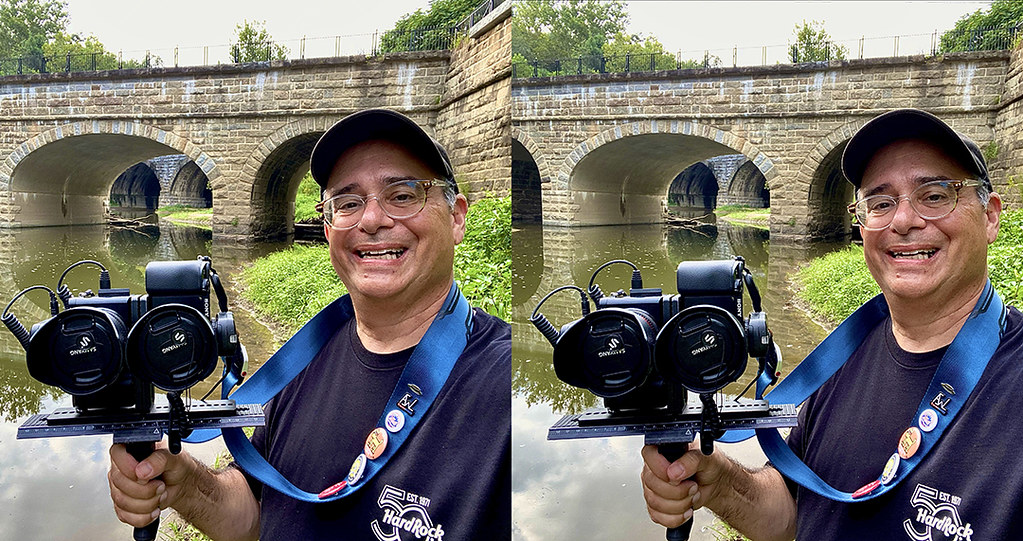
- Vertical arrangement – This is the set up I ultimately chose. It involved attaching 2 “L” shaped brackets to the mounting plate I already had. Doing this allowed me to still alter the stereo base, though my “Street Photography” intention for this rig has resulted in me keeping the cameras as close as possible (ie, the stereo base is 3 inches/7.6cm). The cameras are attached to the vertical part of the “L” bar, which has a groove allowing the height of the cameras to get adjusted so that they are vertically aligned. In appearance the cameras appear bottom to bottom. I have found it most convenient to slide one camera as low as possible so that I only need to move one camera up or down to get it in proper alignment with the other camera. It is very important to take care that the cameras are aligned with each other. This set up has 2 axes of rotation and a height element to match up between the Left and Right cameras, as compared to 1 axis of rotation on my DSLR’s side-by-side landscape set up I use with that rig.
Having my cameras in a portrait orientation, instead of a landscape orientation like with my DSLR rig, does not affect how I shoot with this rig. As with the DSLR rig, I set the viewing screen for this rig with a grid display. I then use the central square area of the grid on the screen to compose my shot. Therefore, the orientation of the cameras does not matter for the purposes of my composing a shot as I target only the central square area of the display screen for it.
There is a technical aspect to this camera orientation that bears on shooting stereoscopically as it introduces a risk of rivalries. Specifically, the CMOS sensor in these cameras uses a “rolling shutter” to capture the image by rapidly scanning the scene line by line in a certain direction (unlike the way a CCD sensor does, which uses a “global shutter” to capture the entire scene all at once). The cameras in this orientation are rotated 180 degrees to each other so the processing occurs in opposite directions for the two cameras. For fast moving objects this type of sensor is vulnerable to what is called a “rolling shutter” effect. With cameras, like mine in this rig, oriented differently to each other the “rolling shutter” effect would go in opposite directions to each other creating another source of rivalry between the Left and Right images. I therefore need to keep that effect in mind when I shoot with this rig. It is not much of a concern though for me as my intent for this rig is for “Street Photography” types of situations and not ones likely to present the kinds of fast moving objects where the “rolling shutter” effect typically appears.
For this rig I use a pair of Samyang 12mm lenses. I discovered an interesting characteristic of this lens is that, for focusing purposes, subjects farther away than 3 ft/1 meter are considered as being at an infinite distance away. That greatly simplified my goal for this rig of doing spontaneous “Street Photography”. It did so because all of my subjects would be farther than 3 ft allowing me to keep the lens’ focus at infinity. Once I also adjusted the aperture and shutter speed at conservative settings for the current lighting situation I was free to shoot without needing to look much more at the camera. I now had a sophisticated “Point and Shoot” 2-camera stereo rig where I could concentrate almost exclusively on composing and taking my shots. I found myself now able to shoot with the rig lower then eye level because the extra wide angle lenses captured a lot of the subject area, the lenses were focused on infinity and my aperture was conservatively set to allow a large depth of field. With the Vello Freewave system I merely needed to point the cameras in the general direction I wanted to shoot, without needing to look at the viewing screens, and fire them off with the Vello transmitter. Because I was no longer looking at the viewing screens when composing the shots I did not have a guide for making sure I was holding my cameras level. As a result, I affixed a small bubble level to one camera to help me keep the cameras level.
I do not use a monopod with this rig. Instead I use a camera strap and a hand grip. One side of the camera strap gets attached to the left side of the Left camera and the other to the right side of the Right camera. I attach a hand grip into the hole in the mounting plate that a tripod/monopod goes. This provides stability as I’m photographing.
My Current “Street Photography” Rig Set Up
- Camera – Sony Alpha a6100. APS-C sensor
- Mounting Plate – I use a 26cm/10.2 inch 2 way macro shot focus rail slider
- Camera strap
- Method of Synchronization – Vello Freewave
- Lens I use – Samyang 12mm f/2.0

Some Final Thoughts
A 2-camera rig can be a powerful and versatile tool for doing stereophotography. But, having excellent camera equipment is not a guarantee of having excellent stereoimages or compelling images (the two are not the same thing). A stereoimage created with such a rig might check off all of the correct boxes in terms of its window setting and avoidance of rivalries. And yet, creatively and artistically, it can still be boring. My goal for my stereoimages is to transcend merely conveying dimensionality. Not only do I look for my images to be compelling as stand-alone 2D images but to have the addition of stereoscopy make them more compelling and enhance the visual story I am trying to tell.
When I am asked for my insights about shooting stereo there seems to be an expectation that there is a “secret ingredient” to share. Alas, I don’t have one. Inevitably, I will jokingly say “I am just a simple country photographer” who uses basic photographic techniques. Nothing fancy. Nothing tricky. However, I do believe I have benefitted from my pre-digital photography days where film came in rolls of 12, 24, and 36 exposures. That taught a deliberativeness of what you took a picture of lest you ran out of film before you were done taking pictures.
I have also benefitted from the writings of the photographer David duChemin who provided me with a vocabulary for the thoughts I had about how I approached photography but lacked the words to express them.
The link between my film photography experiences and David duChemin’s writing with my stereophotography is the importance of thinking about what you are choosing to photograph, why you are photographing it and why you are photographing it in a particular way. It is the difference between doing snapshots and really photographing something. It is a way to move past just getting lucky when you get a good photograph to establishing excellence consistently and developing your own Creative Voice that sets your images apart from those of others.
Anyone can create a stereoimage by taking 2 sequential images with a smart phone. It has truly become that easy. But, there is nuance to doing it well. I will skip discussing the basics of how a camera works and elements that go into what make a photography compelling. I will discuss some of things I consider about composition before I take any kind of photograph – both 2D and 3D.
I generally do not take a picture until I am satisfied with the composition I see on my display screen. What I see on the display screen will be pretty close to what my final image will look like without much cropping later when I post/print the image. I am frequently a “one and done” photographer. The extra level of complexity for my stereophotography is that the composition has to be compelling within a square shape, as opposed to a standard rectangular shape, in anticipation that I will create stereocards with square images.
Stereoscopic composition has an additional critical feature: there must also be depth elements in the scene at distances appropriate to the stereobase. In order for the stereoimage to be compelling the depth elements need to have a degree of prominence to provide a noticeable sense of depth in the scene. The depth elements should not be random parts of the scene. Instead, they should play a role that reinforces, and does not distract from, the overall composition. Frequently, I will position myself for the composition I want and then wait patiently for some foreground element to come into the scene to provide the needed depth element the image needs. I did this with the above Mastaba image where I patiently waited for nearby birds that were in the water to take flight and fly into the scene.
I believe an underappreciated aspect of stereophotography is taking into account that we possess an active viewing system, and its role regarding rivalries in stereoimages. Our depth perception is more than a passive transmission system from our eyes to our brains. There is an active perceptual system that processes, filters and fuses the Left and Right images together resulting in a unified single image by which we perceive depth. The perspective of what we see also changes with the constant movement of our heads, no matter how subtle. A stereoimage is unlike how we visually perceive things. Instead it freezes a particular moment along with the unique viewing perspectives of the Left and Right cameras in that moment. This artificial freezing of the moment can lead to distracting rivalries between Left and Right stereoimages that were undetected in the moment by the photographer. Once aware of the sources and types of rivalries a stereo photographer can take steps to avoid some of them before taking the picture by shifting your shooting position by only a little bit. Other ones can be fixed using StereoPhoto Maker’s (SPM’s) clone tool.
Some Types of Rivalries
- Key-holing – My first experience with this type of rivalry was created by gaps in a picket fence. What showed through these gaps in the left image differed from what showed through the right. Sometimes,a gap will appear to the Left camera but not to the Right one. When I see that key-holing exists I adjust my shooting position to either remove the gap from the view of both cameras or to have it exist for both.
- Reflections in windows. These kind of mismatches are not always obvious as I’m shooting. I will correct those with SPM’s clone tool.
- Water reflections/ripples – The light that arrives to the Left and Right cameras may have different patterns of reflection. The shape of ripples may look different to the two cameras. The closer you are to the ripples the more likely there will be differences in how the reflections look. In those cases I will either clone out the differences, crop tighter or both.
- Snowflakes – I had imagined shooting snowfall stereoscopically would create a very interesting effect of appearing inside a snow globe. What I did not expect is that each snowflake could reflect sunlight differently in a way that the two cameras might not capture the scene identically – snowflakes seen by one camera might not be visible to the other one. When I worked on the stereocard for one of these scenes I wound up having to do a very extensive amount of cloning to remove the large number of distracting rivalries on a snowflake-by-snowflake basis!
A 2-camera rig can be a very powerful tool for doing stereoscopic photography. While it offers advantages over using dedicated stereocameras and shooting sequential stereos with smart phones it also has its own limitations and shortcomings like any other tool. I hope my experiences with assembling my 2-camera stereo rigs and photographing with them are useful to those who have wanted to learn more about them.
I want to thank Rebecca for asking me to write about my stereo rigs and for including this article as part of the first international Stereoscopy Day celebrations. Her deep knowledge of stereoscopy, enthusiastic promotion of it and fantastic photography are an ongoing source of inspiration to me. I cannot overstate my gratitude for her friendship, support of my stereophotography, and encouragement of my historical research. I look forward to future collaboration with you. Thank you Rebecca.
I also cannot end this article without expressing a huge Thank You to Diego Ruiz. He was the first friend I made in the stereoscopic community. As I wrote this article I found myself thinking about the many conversations we have had discussing photography, stereophotography and art. His influence on me as a photographer, how I think about stereoscopy and as a friend are immeasurable. Thank you Diego. Of course, any errors in this article are solely mine.

Copyright © The Stereoscopy Blog. All rights reserved.

I discovered Andrew’s stereo photos on the London Stereoscopic December 2022 gallery, and a google search for more led me here. It’s a treat and rare to fine someone with both talent and a great way of teaching and writing.
LikeLike
Thank you for your very kind of compliment. I appreciate it a lot.
LikeLike
Andrew– I am planning on building a stereo rig with Canon 5D mk ii — this will be the “easiest” way since I already have a 5D– and I wanted to know which model the Vello Freewave you have. I see B&H has a “Vello FreeWave Wireless Remote Shutter Release for Canon with 3-Pin Connection”. I will order two of course.
LikeLike
Thank you for a very thorough essay on stereoscopy.
When I was very involved in 3-D camera systems the biggest issue I saw I had to address was the temporal anomalies. If the frames were out of sync, even by just a part frame, then any panning shots would have the background potentially float in front of the object we were shooting. Yes, we were taking action photos of cars, skateboarders, skiers, etc., so we were following the subject.
Having global snap would’ve been fantastic, but we were backed into small sensors. We also had a Z layout, so one sensor was “upside down”. We had some control over sensor readout and found fastest readout time, coupled with the shortest integration time were two ways to really help us out. When you don’t have that level of control, then the shortest exposure time is what you need, but that’s true of all action shots.
The other one was the sync between sensors. As you mentioned, and I can’t stress this enough, the shooting lag is key. We’ve all had those moments when using autofocus and the camera falters. With stereo, you really do need to have the focus pre-set. Likewise, auto metering, setting left and right to the same settings for exposure and gain is very important.
The shooting lag for cameras, even when using full manual control, will be different. If the camera’s main CPU is in a doze or sleep mode after being left idle, it may take a little longer to warm start and capture the image. I would make sure the camera’s auto low power and auto power off is disabled for the 3-D shoot.
How do you keep shooting-lag matched between two cameras? The trick we used we borrowed from broadcast TV; we had a “house sync” ganging the vertical sync of our sensors together, this guaranteed line sync between sensors, but we had under-the-hood access to our camera system.
I have fond memories of fixing 3-D issues, thank you for reminding me of all the fun challenges I had and overcame.
LikeLiked by 1 person
3D-greetings from Holland. Wim Hoppenbrouwers
LikeLike
Greetings from the UK Wim!
LikeLike
just saw this would this work to capture vr180 using dual fisheye lenses and would it work for video ? i assume it would but is there anything i need to look out for if i build a rig like this and which camera would you suggest for timecode syncronisation between the two cameras and files 🙂
LikeLike
Timecode synchronization is possible with some newer Canon cameras – look for the function “Time synching” and “Linked shooting” in the online camera manuals. Canon says there might be an error of ±0.05 seconds. I don’t know about any other brands.
You should still do the classic movie “clap board” trick to have an audio synch signal in your video (and any microphone recordings). I understand DaVinci Resolve can easily synch using this method, but I have not tried it personally.
LikeLike
Very nice and inspiring write up. I’m going to be dipping my toe into the “cheap end of the pool” to start with sets of identical compacts (both normal and IR converted) and evolve from there, but had one quick around focal length synchronization on zooms. Do you simply stay at the wide end of the range?
LikeLike
I did not know this type of photography existed. I considered setting up two cameras, but unfortunately they are not the same makes, and the lenses are different focal lengths. I did the old Google search, “twin DSLR set ups” and come across this article. I found it very interesting reading.
I actually can make up a pair of identical cameras make and model, but one needs a repair, the aperture diaphragm is not working. I have not got two lenses that are the same, so that I assume will alter the out come of the image.
I am a very amateurish photographer, I have been chasing the Southern Lights, Aurora Australis. This is what gave me the idea, of having two cameras taking pics at similar times. I have already done something similar with my DSLR and my phone, and then I thought about having two cameras side by side taking photos. Is it super critical to have the same focal lengths and iso, f stop? With this type of photography the image is constantly changing, you are probably aware of the Northern Lights so you know what I am doing.
Regards
Robert Dumesny.
Victoria, Australia
LikeLike
Good morning Robert, that sounds like an amazing photography project! I’ve always wanted to see the northern lights, but I haven’t had much luck in the south of England. I once went to Iceland, but they didn’t appear when I was there; it must be incredible to see. I’m realibly informed they look much better in photographs, but I’d love to be able to tell haha! I’m so backwards that I didn’t know Southern Lights were called Aurora Australis, I love that.
Anyway, sorry, I’m getting excited! It’s definitely better to have the same lenses and settings on both cameras. It also depends how much difference there is between them, as you can correct some differences to an extent using the free software StereoPhoto Maker. I think the best thing is to try the setup in the daytime, or on something with more control, like outdoor lights at night, and check out the results. I photograph wildlife with two identical cameras and lenses, and it’s vital they’re the same, otherwise the difference is too much for a moving subject (but also with zoom lenses).
Also, and sorry if you’re already aware of this, keep in mind if you’re photographing in stereo, it’s better to have something in the foreground, otherwise there won’t be much 3-D depth if the subject is far away.
I hope that helps,
Take care and best wishes,
Rebecca
LikeLike
Hi Rebecca,
Thanks for your return email, I certainly did not expect a reply so quick.
I have realised that I have two lenses that I can achieve the same focal length and f stop. But will be on different cameras. One is a Canon 1300d and the other Pentax K30. I am going to see how much it will cost to repair my second Pentax K30 body.
I am waiting for a couple of arca swiss quick release mounting plates for my set up. The next thing is, after the images are taken and there are two seperate images what is the next process to get them to look stereo? I cant visualize how to join the images together so to speak. looks like more homework.
Cheers
Robert.
LikeLike
Good afternoon Robert,
A good place to start so you can import your left and right photos, align them, edit them (to an extent), save and/or print them is the free app ‘StereoPhoto Maker’. I’ve written a tutorial on using it here: https://stereoscopy.blog/2019/09/08/how-to-use-stereo-photo-maker-basic-tutorial/
I hope that helps.
Take care,
Rebecca
LikeLike
Hi Andrew, thank you for a really informative and nicely written article. I’m just getting into stereo photography and am putting together a twin camera set up using 2x Olympus Pen E-PL8 (nice and small!). I’d already arrived at using the cameras mounted on a simple rail/bracket and had been wondering at syncing the shutter release now that cameras no longer have mechanical releases and twin cable releases are no longer possible. The wireless remote release is a great idea for us non-contortionists! I found that the Vello Freewave is no longer available but an apparently identical item is available as the JJC JM-II transmitter/receiver set. It really does seem to be identical apart from the branding. Have ordered two but untested as yet. It was really useful to read about your & other people’s experience of manual vs automatic ISO, exposure, focusing etc. and this has saved me a lot of trial and error. Thank you all! I just tried out my dual E-PL8 set up for the first time (shutter released in the style of a neophyte contortionist until remotes arrive) and it works brilliantly well! Here’s a good tip for people with small digital cameras without a remote: turn the whole rig upside down – it’s much easier as your hand are in a more natural/comfortable position and if you have an articulated or flipping display it’s actually very nice this way – though it does look slightly mad. Anyway the results are quite the step up from my other methods (Lumix 12.5mm 3D lens or doing the cha cha with camera or phone). I like the look of your vertical dual L bracket set up so might try that as well (currently at about 13cm apart with bodies side by side). I think I’ll just set the aspect ratios in camera to 1:1 or 4:3 and it will work beautifully. I wasn’t quite sure how you’d done it but I looked at your stereo image on flickr and it all became clear! Stereoscopy is awesome 🙂 Your article, pictures and the comments below it are a boon. Thank you!
LikeLike