

I’m pleased to welcome back to the Stereoscopy Blog Norwegian photographer and artist Ida Marie. In this post she will share with you her experiences of processing the first film from her Sputnik camera.
Thank you so much Ida Marie, I’m sure you will inspire people to dust-off or discover analogue stereo cameras and enjoy some darkroom adventures of their own! For part one, please see this post.
____________________________________________
Written by Ida Marie
Before we start I would like to send a thought to fellow analogue photographers who willingly share their knowledge and experiences: Thank you!
Onwards we go. Oh, and remember that smell of grandmas attic? It makes its return!
What you are about to read is the second and final blog post about my first adventure with a Sputnik stereo camera. In this part I will take you with me through developing the film, making prints in the darkroom, and finally, hopefully, ending up with some stereographic cards.
1st Step: Developing the Film
This first step does not require a lot of equipment. If you have a developing tank, a couple of reels to put the film on, measuring cups and a space that can be darkened, or a darkroom bag, you are all set. I would also recommend that you use gloves and work in a well-ventilated space, or to use a suitable mask.
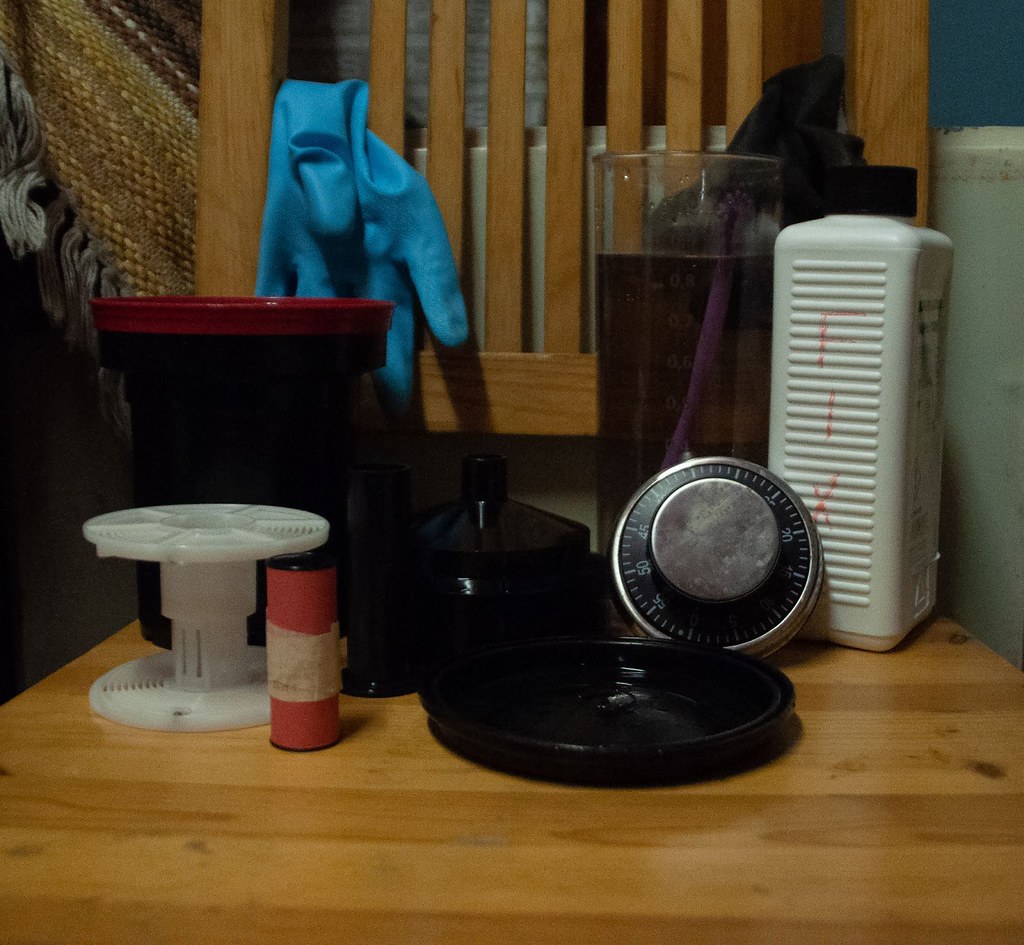
Working with 120 film and 135 film has its differences, the size of the cameras and the negatives being one, the way the film looks being another. While 135 film comes in a canister, 120 film has two layers: film and backing paper, and no canister. When working with 120 film, I separate the first part of the film from the backing paper before starting to spool it onto the reel, I find this method makes it a bit easier to wind it onto the reel. When doing so the smell of grandma’s attic once again rose to my nose as the first part of the paper was separated from the film. Fittingly enough, I was standing in a room which is used for storing old junk; the smell had found a suitable home!
Spooling the film ready for developing needs to be done in complete darkness as the film is still light-sensitive; any light that seeps in may result in either light-leaks on the negatives, or completely black frames. After the films are spooled, I put the developing tank together, which also has a funnel and a lid. Once the lid and funnel are screwed on, the tank is light-proof.
The process that follows depends on a variety of factors such as film, developer of choice and the person who is doing the developing. If you are unfamiliar with the process, you may think it is all about film and chemicals. Of course, you can strip it down to this, film being the light-sensitive material where the images are captured, developer bringing the image out, and fixer preserving the image for the future. However, I believe that the human aspect of this is also important. When we first set out on a journey of building a new skill, we copy others. As time goes by, we grow and our knowledge increases, our routines change, and we find a comfortable way of working.
When it comes to developing time, there are a few different ways to find this out. Newer films may have it written on the inside of the box it comes with, you can find a list of times and films from the producer, or you can use The Massive Dev Chart online. For a film like I am using here, an expired film no longer in production, I found the time over on Massive Dev chart. Currently I am using Rodinal or coffee when developing, in this case I used Rodinal diluted 1+50 with water. I entered the film and developer of choice into the Massive Dev Chart and searched. For Svema 64 at ISO 64, Rodinal mixed 1+50, the chart recommended 11 minutes developing time. I agitate 10 times first, then once every minute. After the 11 minutes are up, I dump the chemicals in a suitable container (remember that this is special waste, dangerous to the environment and should not be dumped into the sink or toilet) and rinse the film.
The next step is to fix the film, this is the part that makes the negative stable and able to handle light. I use Ilford Rapid Fixer; I like this because I can use the same fixer for film negatives and photographic paper. When it comes to time, I use 5-6 minutes. I agitate it the same as I did with the developer, 10 times at first, then once every minute. Fixer can be reused and so it is poured back into its container afterwards. I use an original fixer bottle for this, but you can also buy specific bottles which are designed especially for this. Then it’s time to rinse again; I try to be patient and let it sit under running water for a couple of minutes, sometimes I will add more rinsing after I have checked the film and find it needs it.
Pulling the film out of the developing tank is perhaps the most exciting and nerve-wracking part of the process. After all, this is where you discover whether you have something on the roll or not.
Drum roll please…
…Tada!

Nothing.
But wait a minute, earlier I mentioned how we all tend to make our own routines. One of mine is to hold the negative up to the light for further investigation, even when it appears blank.

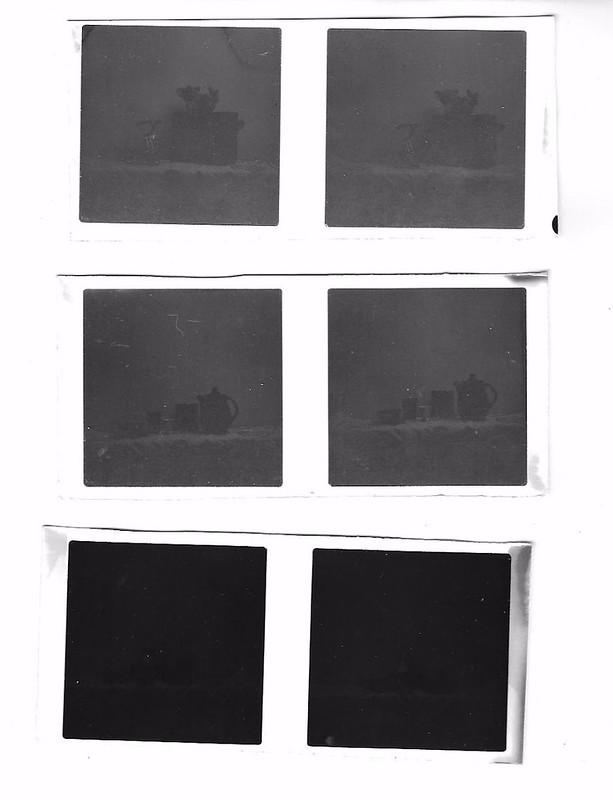
The negatives are faint but we have something, three stereo pairs to be exact, and a single one. Before we can print, we need the negatives to dry; I tend to hang them up and let them dry at least overnight.
2nd Step: Making a Darkroom Print
Are you still with me? Good! Fill up your coffee cup, get some sugar in your system and let us carry on to printing.
This step requires more equipment and is not for everyone. You will need the following:
- enlarger
- red safelight
- a dark room
- 3 developing trays (or other containers such as square ice cream boxes or similar that are not too small. Don’t use these for food later!)
- paper developer, photographic paper, water and fixer
A darkroom does not need to be complicated; I have a bench in the washing room, my enlarger sits on top of it and my trays live in the closet underneath. It is located right by a window, over which I have a blackout curtain. Some light is still able to pass through so I tend to work after dark, but just for safety I also put up a piece of cardboard between the enlarger and the window. It is simple, but it works.
Photographic paper is light-sensitive, but not to a red safelight, this is why we need one. Look for lamps specificially for darkroom use, or bulbs.
Photographic paper comes in two main categories – resin coated (RC) and fiber-based (FB) papers. Then there are also several under each category with various differences. RC paper is lightweight, it requires less rinsing than FB paper and it dries flat. FB paper, on the other hand, is heavier, requires longer rinsing and curls up while drying and needs to be flattened when dry. There are several brands available as well, the most common where I live (Norway) is Ilford and Foma. For these prints I will be using Fomabrom Variant 111, a fiber-based paper with a glossy finish.
When printing, I like to make a contact sheet, which gives an overview of the photos; it is also a good starting point to decide time when printing. It is made like a sandwich: the paper, the negative and a piece of glass; the piece of glass could be as simple as one from a picture frame. Before I make a contact sheet though, I make test strips to find the best settings for the enlarger and the negatives. Test strips do not need to be large; rip a piece of paper or cut a strip with some scissors.
These test strips are then made as the above-mentioned sandwich: test strip, negative and glass. To make a test strip with several different exposure times on them, you need to put a box or something similar on top of parts of the test strip. You turn on the enlarger for a couple of seconds, then move the box, light it again and then take away the box before lighting it one more time.

Above is an overview of those which worked out of the first test strips. The first one shows an accidental double exposure; I had left a negative in the negative holder of the enlarger, so when turning the light on to expose the negative underneath, the light travelled through two negatives instead of one.
Without getting too technical (there are people better suited for that then me), the enlarger’s f-stop decides how much light goes through the negative and down on to the photographic paper. A high f-stop lets little light through, whereas a low f-stop lets a lot of light through. From these test strips it was clear that the negatives required a high f-stop and a short exposure time. I would also need to increase the contrast.
Unsure about my next step, I decided to make a contact sheet and let it dry over night. Once dry I saw that the areas which were supposed to be black, were in fact grey. This is a sign the developer may be exhausted, so I made up a fresh batch and made a new contact sheet.

Left: old developer. Right: fresh batch of developer.
With a fresh batch of developer the black became black, but there was still a lack of contrast. My enlarger has a colour head, and I remembered you could use this for adjusting contrast, however, this is not something I have worked with previously. I started to look for the user manual and posted a question online for people to share their experiences of working with a colour head for black and white printing. The user manual seems to have gotten lost during cleaning before Christmas, but I got some replies from people online. Magenta can be used to increase the contrast, whilst yellow can be used to decrease the contrast. From looking at the test strips I could tell that I would need a higher contrast, this would allow the subjects to stand out more from the background.

Here are some test strips where I tried various degrees of magenta, and some where I tried split grading. Split grading is when you expose the paper twice with different settings of contrast, one low and one high. When it came to making notes, I messed up; I guess this is becoming quite a “how not to do things.”
At this point I got a hint to increase the magenta all the way up. Apparently a rule of thumb when working with faint negatives is: the fainter the negative, the more magenta is needed.
We are now closing in on the final prints. I was lucky enough that my Sputnik came with a contact-printing frame. This is a frame with a piece of glass, where you sandwich the negatives and the paper. It simplifies the process of making the print, because it makes sure both the negative and the paper are kept in place.
The original Sputnik printing frame is 13x6cm and so to fit the photographic paper in the frame it needs to be cut to size. I measured and cut the paper in the dark, but this is not necessary if you don’t have the mentioned frame. Be careful when working with scissors or knives in low light so you don’t cut yourself.
From the test strips and contact prints we know the required settings and time: f-16, 200 magenta, 2-3 seconds.
And here they are, the final prints:
(These prints are directly from the negatives, they are untransposed so you will need to cross-view to see them in 3-D – Rebecca being a nerd)
I hope you have gotten something from following this process. Maybe I have piqued your interest or maybe I have given you a new list of “how not to work”. Either way; I have had a blast.
Would I use this camera again? Yes I would. But it won’t be with old film. In the beginning of owning this camera I was also a bit nervous to take it with me outside, that nervousness is slowly disappearing and I think I might actually take it on a couple of outdoor adventures. It can probably do with the fresh air after all and not just laying in a box in a drawer, which it currently is.
_______________________________________
Rebecca: I used Ida Marie’s last photo and StereoPhoto Maker to make a framed stereoview as a surprise for her:
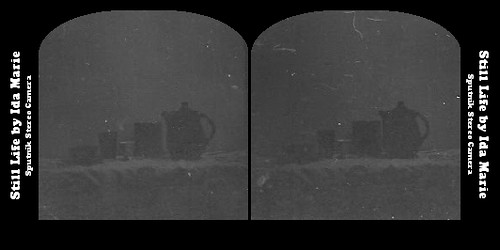
I like that the composition and the atmosphere really remind me of some Victorian still life stereoviews. Thanks so much Ida Marie, I can’t wait to see the results of your next reel through this stereo camera.

Copyright © The Stereoscopy Blog. All rights reserved.

One thought on “My First Adventure with a Sputnik Stereo Camera, Part 2”