

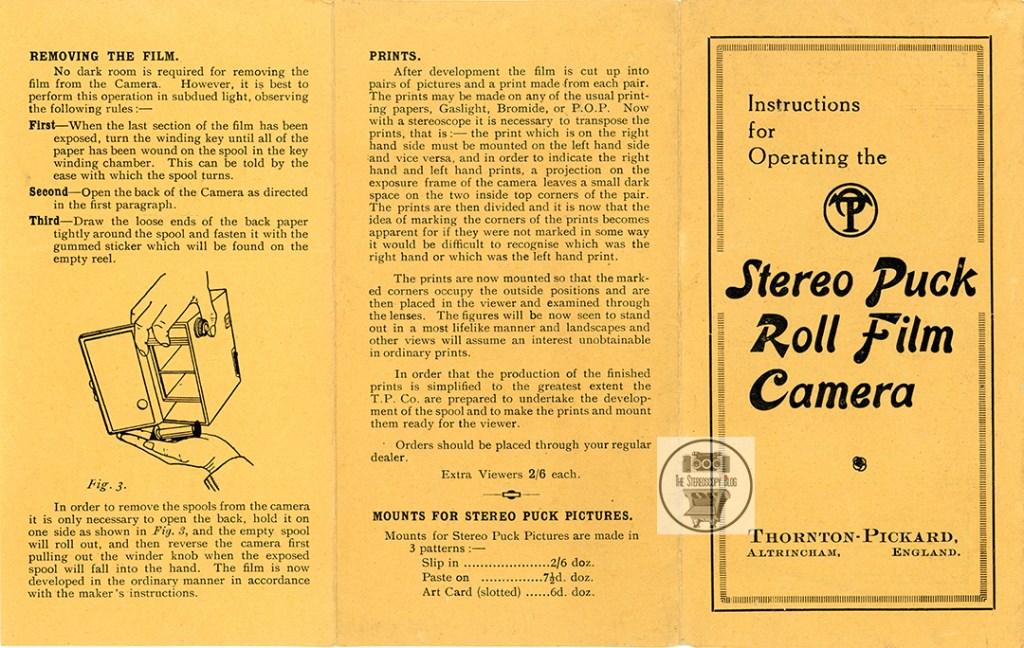
The Stereo Puck is a simple 120-roll film stereoscopic (3-D) box camera, which can still be fully usable today. I thought I’d finally write a post to introduce it, a step-by-step guide to using it, including offering some free downloads to help you on your way, as well as reviewing using this 90+ year old medium-format stereo camera in 2026.

The Thornton-Pickard Company
The Thornton-Pickard company was founded in St. Mary Street, Manchester, UK, in 1888 by Edgar Pickard and John Edward Thornton, before moving for a larger factory in Atlantic Street, Altrincham (then part of Cheshire), around 1891. Edgar Pickard died aged only 35 in 1897, leaving his family in control of his part the business. John Thornton is said to have been ousted from the company in 1899. In 1921, due to declining sales, the company merged with others to form the ‘Amalgamated Photographic Manufacturers’. The company, however, later went into liquidation and was dissolved in 1939.
(N.B. please note this is a very brief overview of the Company, if you’d like a recommendation for a more in-depth article, please just get in touch).
The Stereo Puck Camera Launch
I’ve read several different dates given for the launch of the Stereo Puck, ranging from 1925 to 1932, but the first reference I’ve found to it being a ‘new’ camera was in December 1931, in the Journal of the Royal Photographic Society, where a fantastic description is provided. I’m unsure exactly where the author J.E. Saunders hung around to meet ‘cameras and photographers of all types’, but I’d like to go, as well as wishing the RPS selection committees were as enthusiastic about stereoscopic photographs today!:
| A Guinea Stereo Camera Now and again one hears that stereoscopic photography is quietly increasing in popularity. Yet the number of stereo cameras actually seen in use does not suggest any great expansion of this fascinating branch of photography. Most of the stereo workers whom I encounter in a certain place – a spot where you may meet cameras and photographers of all types on any fine day – seem to be talking French or German or Japanese, rather than our native dialects of Lancashire or Yorkshire, Birmingham or Tooting Bec. At last, however, a British firm have produced an excellent little stereo outfit at a popular price, which may do something to help spread an interest in stereo work. Messrs. Thornton-Pickard’s “Stereo Puck” camera is a box-form instrument of the simplest type with a one-speed instantaneous shutter and a time device, with single lenses (fixed separation), which uses the popular 2 1/4 by 3 1/4 roll films. Part of the outfit is a stereo viewer of metal, also of simple pattern, which can be carried in the pocket. The whole outfit, viewer included, costs a guinea only. There should be among British amateur photographers quite a number to be tempted next summer to try their hand at stereo work now that a guinea will buy them the complete outfit, an outfit too, which is so inexpensive to run. If they find on a trial that the stereo work does not appeal to them, the experiment will not have cost them very much – and someone will get a second-hand stereo camera cheaply ! On the other hand it is likely that many will be lead to take up stereo work with zest and give our R.P.S. Selection Committee a problem which may even result in some of the wild life and zoo subjects being crowded out of that upper room in Russell Square every September by the mass of good stereo pictures. |
If only the Stereo Pucks were still so cheap! This is where I must add that I think it’s important not to pay too much for these cameras, and, if you’re buying one to use, make sure you get a later one with the additional magnifying lenses, I’ll explain why in the next section. They vary widely in prices, but to give you an idea, I bought a fully working one two years ago for £50 GBP, which, whilst not pristine, does exactly what I was hoping for: takes usable stereoscopic photographs.


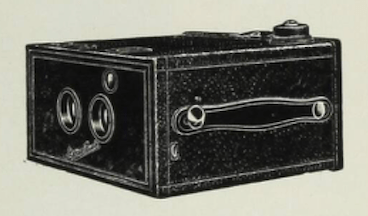
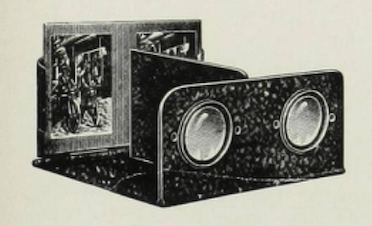
1930s Canadian advertisements for the Stereo Puck camera. I believe the top illustration shows a MK 1 model, without magnifying lenses, and the bottom two show the MK 3 model, with the additional magnifying lenses lever and a middle selector for taking either mono or stereo photos.

Original Stereo Puck folding metal stereoscopes, made to fit the original Stereo Puck card mounts, and the viewers work very well with this format.
The Stereo Puck Camera Specifications
The camera is a wooden-bodied box in black leatherette with a small view-finder, and two achromatic lenses with a fixed separation of 4.25cm (1 5/8″), so quite close, but this is due to the frame format. The lenses are a fixed single focus, and there is one shutter speed for ‘instantaneous exposures’, but with an additional lever which allows you to leave the shutters open for a longer exposure, also called ‘time mode’. There are three aperture options, and, whilst the manufacturer was not very forthcoming with the exact specifications, they state the largest is for Autumn/Winter, the medium for Spring/Summer and the smallest for very bright light, particularly at the seaside! A search online gives the estimated fixed instantaneous shutter speed of between 1/20th to 1/50th of a second (but I think it will also depend, by now, on the condition of the camera), and suggested apertures of f12.5, f18, and f25.

Front-view of the Stereo Puck camera, showing the lens separation and branding.

Top-view of the Stereo Puck Camera, showing on the front left is the shutter release lever. To the front right is the viewfinder window, with the swinging magnifying lens lever next to it. The magnifiers were available with the MK2, which my camera is an example of…a well used one.

Top-view of the back of the Stereo Puck camera, showing the winding knob with directional arrow on the top left, the metal catch plate in the middle, which opens the back of the camera, and the ruby window at the bottom, for checking the frame count.


Side-view of the Stereo Puck camera. The lowest small metal tab is the ‘timed’ shutter release; when pulled out the shutters will stay open until you manually close them again. The metal tab above it, in front of the leather strap, is the aperture tab, with three apertures available.
As mentioned before, the Stereo Puck camera takes 120 roll film, which is why it’s quite desirable today, despite it being basic, as the film is readily available. Each half stereo image it takes is about 5.5cm x 4cm (2.25″ x 1.5″) in size, with eight stereo pairs in total per standard 120 film roll. As with medium format stereo photography, despite it being smaller than full-frame, it’s still a joy to work with, giving you the possibility to make contact prints from the negatives for your stereo pairs.

The frame-format of the Stereo Puck camera negatives (top), and comparing them with a ‘standard’ full-frame 120 format from the negatives made with a Rolleiflex camera (bottom).
The Stereo Puck MK 1 was made from 1931, and MK 2 was made from around 1933, with the difference being the inclusion of a pair of swinging filter-like magnifying lenses on the MK 2. The leaflet with the MK 2 camera states: ‘The new Model has the same general specification as the standard pattern but is fitted in addition with a pair of Automatic Swinging Supplementary Magnifier Lenses, enabling portraits and close-up pictures to be taken and giving a range of distances from three feet to infinity.’
For me personally, the magnifying lenses are a must. If you consider the lens separation of only 4.25cm, it means you need to be quite close to the subject for good 3-D depth so the camera is great for portraits and close-ups and not much else; if you go by the 1/30th rule of thumb, it’s best to be around 1.28m away from the subject. However, without the magnifiers, it can be struggle to get the subject in focus and still have some stereoscopic depth, especially with the limited adjustable camera settings. I also don’t think you would use this camera for landscape photography without something quite close in the foreground, or the stereos will be very…flat.

A 1930s Stereo Puck stereoscopic photograph with a home-made mount. There is very little depth due to the subject being too far away for the lens separation.

A 1930s Stereo Puck stereoscopic photograph with a standard mount, showing Brits observing the tea-time alarm 😉 Notice there is better depth with a closer subject.

A 1930s Stereo Puck stereoscopic photograph with a home-made mount. Whilst the subject is nice, albeit slightly too far away, a branch has gotten in the way of the image and is a bit distracting. I’ve included this one too to show there is an occasional problem in some photos of one half being slightly out of focus, but in the stereoscope it tends to be corrected to an extent, when the images are fused into one 3-D image.

A 1930s Stereo Puck stereoscopic photograph with a standard mount, showing a swan as a subject. Included because more swans should be subjects.
I’ve found a reference that says there was also a later version of the camera which was able to also take mono photos. I’ve yet to see an example, other than in the advert illustrations above, but I’d love to see one.
Stereo Puck Camera Step by Step User Guide
I’m going to use some of the original illustrations from the instructions for this, as well as adding some additional photos.
You can also find scans of the original instructions for you to download here:
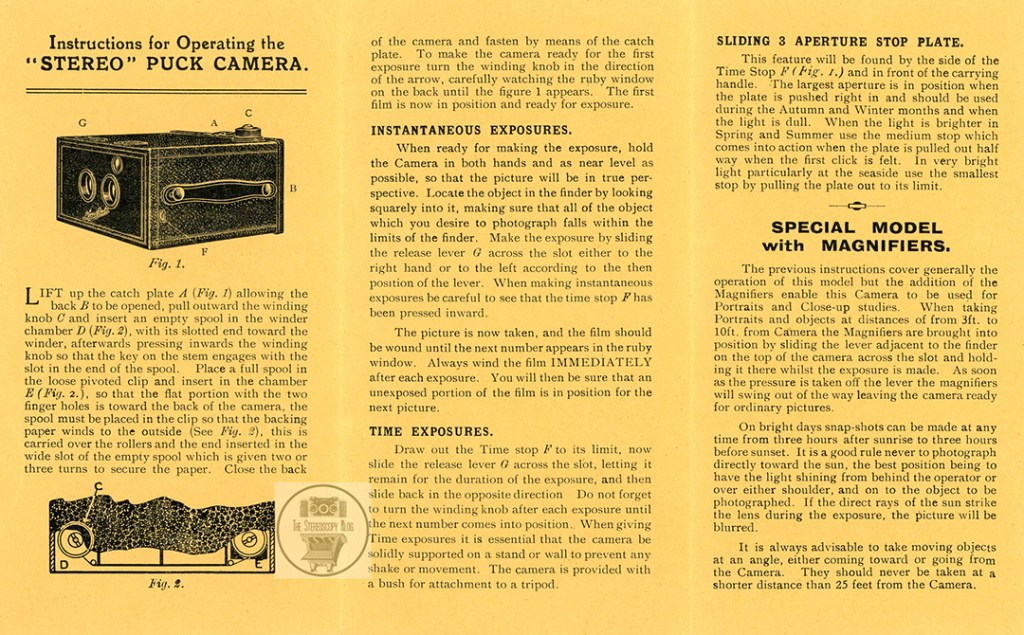
To load the camera with 120 film:
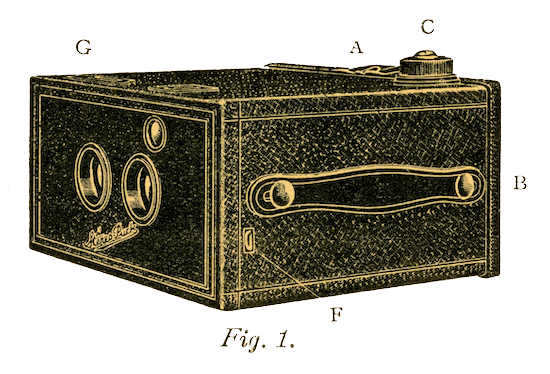
- Lift up the catch plate A (Fig. 1), allowing the back B to be opened
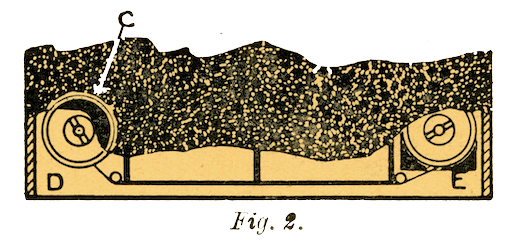
- Pull outward the winding knob C and insert an empty spool in the winder chamber D (Fig. 2), with its slotted end toward the winder.
- Press the winding knob C inwards so that the key on the stem engages with the slot in the end of the spool.
- Place a new 120 roll film in the loose pivoted film-holder clip and insert in the chamber E (Fig. 2), so that the flat portion with the two finger holes is toward the back of the camera; the spool must be placed in the clip so that the backing paper winds to the outside (as in Fig. 2).
- Carry the film over the rollers and insert the end into the wide slot of the empty spool, giving it two or three turns to secure the film.
- Close the back of the camera and fasten with the catch plate A.
- To get the camera ready for its first exposure, carefully turn the winding knob C in the direction of the arrow embossed on it until you can see frame count “1” in the ruby window on the back of the camera.


The back of the Stereo Puck showing the ruby window, and film chambers, including the removable ‘loose pivoted clip’ film holder, essential for keeping the film roll in place.
To take stereoscopic (3-D) photographs:
- I really recommend using the camera with a tripod as the shutter speed can be quite slow, there’s no option to use an external shutter release, and using the magnifying lenses at the same time can be quite fiddly.
- Make sure the camera is level.
- Locate the subject in the viewfinder, ensuring all the scene you want to capture falls within it, and the subject is at a suitable distance for good 3-D depth.
- To adjust the aperture, when looking down at the camera, find the the metal tab in the middle on the left side of the camera (above F, but not in the original diagram). The largest aperture is with the tab pushed in, pulled out to the next stop is the middle aperture, and pulled fully out is the smallest aperture.
- If using the camera’s ‘instantaneous’ single shutter speed, ensure tab F is pushed fully in. If you would like a longer exposure time, pull out tab F, which will leave the shutters open when you press the shutter lever, until you manually close them.
- If using the magnifying lenses for a subject 92cm (3 foot) or further away, hold down the lever located to the left of the viewfinder to swing the magnifiers into action and keep it held down for the photo.
- To finally take the photo, for an ‘instantaneous’ photo, slide the shutter release lever G to the opposite side. To take a timed exposure with tab F pulled out, slide lever G to one side, which will open the shutters, and when you’re ready to complete the exposure, then slide lever G back to the other side to close them.
- Wind the film on again using winding knob C until the next frame number comes into view in the ruby window.


The different apertures as the metal tab is pulled further out (with the shutter timer tab pulled out).


The magnifying lenses being swung out by pressing on the top metal lever and holding it down to keep them in place.

A negative (therefore cross-view) showing a photo taken without the magnifying lenses.

A negative (therefore cross-view) taken using the magnifying lenses. Yes, being this close to the subject is not great either!

Removing the film:
- Once you’ve taken your 8 stereoscopic photographs, it’s time to remove the film, which is best to do in subdued light.
- Wind the film all the way to the left spool using winding knob C.
- Unclip catch plate A, and open the back of the camera.
- Draw the loose ends of the film’s back paper tightly around the spool and fasten it with the gummed sticker from the empty reel, to keep the film sealed tightly and protected from light.
- Open the camera back fully, and pull out the empty film holder clip from chamber E to remove the empty spool (it recommends doing this as in Fig. 3, but with such an old camera, I would be careful moving the open back around too much in case it cracks the leatherette hinge holding it together).
- Lift up winding knob C and pull out the exposed 120 film.
- Either develop the film at home or send away for processing.
You can also decide, once you have your developed film, whether to scan the negatives and make digital stereoscopic slides from them – if so, you can use the free software StereoPhoto Maker to make the stereoscopic slides, a step by step guide can be found here. You can also make physical analogue prints, either by printing the digital slides, or by enlarging the negatives and trimming the positive prints if you want to ensure everything is inside the ‘stereo window’, or even contacting printing from the negatives to make straight-forward stereoscopic prints ready for mounting, as the manufacturer intended.
Mounting and viewing your positive prints:
- I’m really impressed with the simple way the Stereo Puck helps you to mount your left and right prints the correct way round, ready to be parallel-viewed in the stereoscope. On the positive prints, you will find a little black line on one top corner of each half of the print. The left half will have the black line at the top left, and the right half will have the line at the top right (see below for a scanned example – unfortunately I don’t have a blank example of this type of mount to share).
- I’ve also made a scan further below from an original blank Stereo Puck card mount so you can print it to the same dimensions and use it as a template to make your own mounts from if you wish – you can, of course, make your own size mounts to fit your available stereoscope. The original card mounts are 9.9cm wide by 7cm high. The two rectangles show where the left and right prints should be placed.
- So, with that, cut out your right and left prints, ensure they’re the correct way round (you can double-check by free-viewing or using a stereoscope before mounting them), and adhere them to the cardboard mount.
- All that’s left to do is to view your results in a Stereo Puck stereoscope. If you don’t have one to hand, this format of stereocard will also just about fit a Camerascope viewer, and, at a push, OWL viewers if you hold the stereocard in place (see further below).

An example of a mount with the top left and right photo black line marks to help guide you when mounting the left and right halves, so you put them the correct way round for parallel-viewing. Note: The Stereo Puck is recommended for 1930s seaside photography 😉

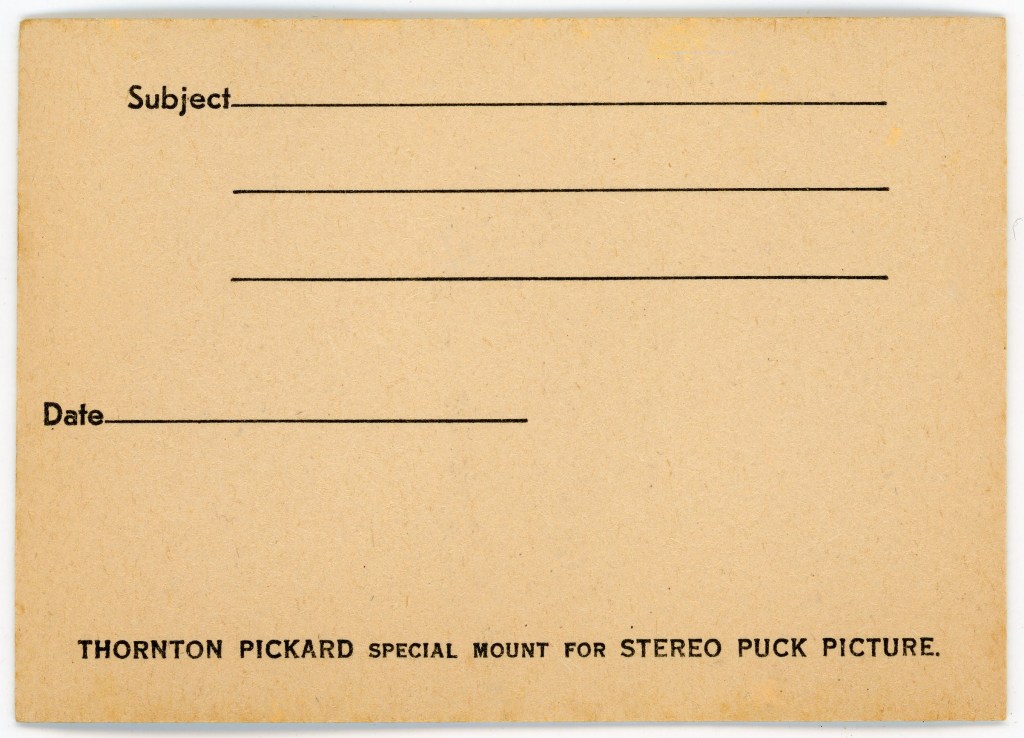
Back of the mount from the previous scan, just because it’s awesome, albeit a bit scabby through time and use!
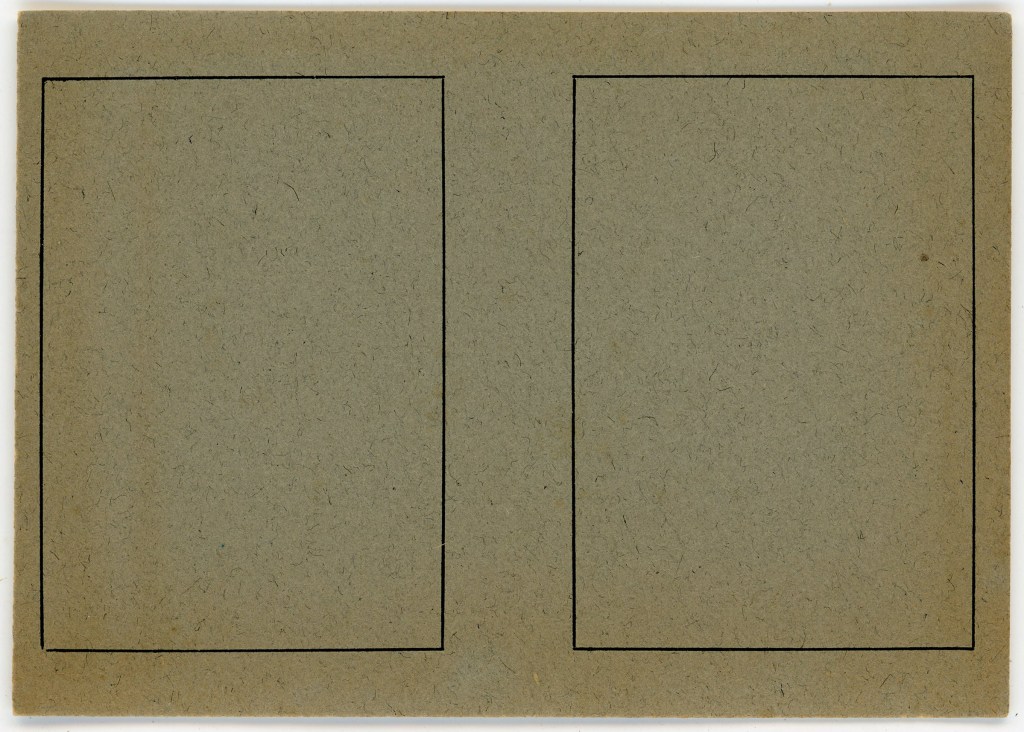
Full-resolution scans of a blank Stereo Puck mount for you to download and use as a template if required.

Cutting and mounting the prints.

One of the stereo pair prints mounted, note the black line markers at the top left and right to show I’ve mounted it the correct way round. Yes, I could have done with a longer exposure, made sure the camera was level, and have been further away from the subject.

The standard-size Stereo Puck mounts in a Stereo Puck viewer (bottom left), a Camerascope viewer (bottom right) and an OWL viewer (top). Nosy cat entirely optional but thoroughly recommended.
Review of using the Stereo Puck camera and stereoscope in 2026
I have to say, once you’re used to the camera’s basic settings, limits and quirks of use, it can really be simple and fun to use, and can produce some great results in the stereoscope. The joy of bringing a 1930s stereo camera back to life with readily available film also cannot be understated.
I’ve read reviews by others using the Stereo Puck camera who have found that one half can be out of focus when compared to the other, and you can see this in some of the 1930s stereocards I’ve scanned. It doesn’t always seem to be consistent, and I appear to have been lucky that both apertures on my camera seem to match, but it’s definitely something to watch out for. If it happens, you may be able to compensate for it, to an extent, by using the smallest aperture, but then you need to make sure you have enough light for a good exposure. When viewed in the stereoscope, there is also some compensation by the brain if one half is slightly out of focus, but whether this is satisfactory depends on your own tolerance.
As I’ve mentioned before, if you’re interested in trying one of these cameras for yourself, I recommend finding one with the magnifying lenses, ensure it comes with the film holder clip, otherwise there will be nothing to keep the film in place in the chamber, please don’t pay over the odds for a glorified simple box camera, and use a tripod to keep it steady and level during exposures. Whilst this means it’s not the most practical stereo film camera to travel with, and it may take some planning to go photographing with, not least because you’ll also have to consider the lens separation for suitable subjects, it’s still a working stereoscopic film camera, and a joy to see the 3-D images it produces, especially with the frame format.
If you want uncomplicated analogue stereo photography, this could be the camera outfit for you. If you want perfectly aligned, in-the-window stereoscopic photographs with good quality results every time, the 1930s RPS reviewer would probably recommend you sell this camera.
I hope you also have lots of fun with your 1930s Stereo Puck!

Copyright © The Stereoscopy Blog. All rights reserved.
