

We’re very fortunate to welcome amazing British artist and portrait painter Michael Taylor RP to the Stereoscopy Blog. I’ve been astounded by his artworks in whichever medium he chooses, and was stunned to learn how he uses stereoscopy, both as an aid to his art and as an art form in itself.
I asked Michael if he would write an article and I’m really honoured to share it with you now. He not only discusses his use of stereoscopy and shares examples of his beautiful works of art, but also gives tips and a brief tutorial (I can’t promise that it will imbue artistic talent or skill though)!
Thank you Michael!
As a child I was captivated by a Viewmaster reel featuring stereo scenes from the TV series Flipper (about a dolphin). In particular I found the reflections in the sea, its transparency and the watery illusion of depth irresistible. Many years later, as a professional figurative painter this fascination would come to my aid when faced with the very practical problem of painting portraits of busy people who were often in no position to give the time I needed to work entirely from life.
I had tried taking reference photographs, but had found them to be next to useless. The conversion to 2D prints irreversibly lost information at all areas of the visual spectrum. It reduced the spatial content to a guessing game based on perspective and ambiguous clues relating to scale. Highlights were bleached out, shadow areas appeared formless and lacking in detail, while skin tones were flat and lifeless. Finally, the delicious surface texture of things: the reflected light, the sheen and sparkle were missing. In short, one could do little more with them than make a representation of a photographic representation. The all-important engagement with the subject was lost.
I struggled on for a while, even considering giving up portraiture as being beyond me on a practical level, painting as I do very slowly and preferring to work in the sitter’s own environment. Then one afternoon, while out for a stroll with my wife, we passed a camera shop displaying a Sputnik medium format stereo camera. Fascinated by its unique ugliness, I pointed it out to her, and sensing that it might be a solution to something, she said surprisingly, and without hesitation ‘Buy it!’ which I did (needing little encouragement)(Fig. 1).

Figure 1: Sputnik 120 stereo camera
After a brief struggle correcting most of its many faults (new light seals, fitting internal baffles, dismantling the lenses and blacking the edges to reduce flare, and finally resetting the lens focus), it turned out to be the best £200 I’ve ever spent. Initial experiments with it quickly made it clear that transparencies provided by far the most useful results for my purposes.
The viewer provided with the Sputnik was optically poor, but replacing the lenses with objective lens units from an old pair of charity shop binoculars of suitable focal length, and fitting opalescent plastic to the rear of the slide holder, produced an extremely high definition viewing experience that is immersive, easily focused and spatially precise. It also turned out that the lens separation of the camera exactly matched my pupillary distance.
The advantages from my point of view were immediately apparent. If the film is correctly exposed there is a hugely improved capture of surface texture and shadow detail. Any spatial ambiguity is all but eliminated and reflected light, surface sheen and reflections are convincingly portrayed. Crucially, the transparency of skin was captured revealing the delicate blue veins beneath. Instead of bleaching out, highlight areas contained usable information, and the shadowy space under a chair, murky and undefined in a mono print, becomes a complex place of air and plottable floor surface, full of incident and mystery. The large format allows the eye (and thus brain) to roam freely around the space, while the effects of constancy scaling (the mental process of apparently increasing the size of distant objects of interest despite their actual area on the retina) can still be experienced to some extent. The only real disadvantage is the absence of motion parallax which renders everything very static. Painting in front of a model involves frequently moving one’s head position slightly to combine many different viewpoints. Taking several views from marginally different positions and regularly switching between them can compensate a little for this limitation.
When we confront a scene, our mind’s eye zooms in on certain elements and exaggerates or distorts them in response to their perceived importance, or emotional value. A single photographic print mostly denies us this response; the content has already been condensed, measured, processed and fixed. The same is also true to some extent of stereo prints (as opposed to transparencies), for while they do exhibit some of the 3D qualities required, they are difficult to work from as they suffer from many of the same drawbacks as 2D prints: they lack luminosity and sense of air, lose surface detail, have a reduced dynamic range and have a tendency to render things as cardboard cut-outs, although recent experiments of working from stereo pairs on an iPad mini with an OWL viewer have been very promising.
It quickly became apparent that the visual information conveyed by transparencies was not just doubled, but increased by a factor of something in the order of six. After all, binocular vision evolved partly as a very effective camouflage breaking device, so it is hardly surprising that comparing the two views reveals more than the sum of the two parts. We have an astonishing sensitivity to surface texture, and it never ceases to amaze and delight me how two apparently identical photographs of a piece of birch bark combined in a stereoscope might unexpectedly reveal an otherwise completely invisible moth.
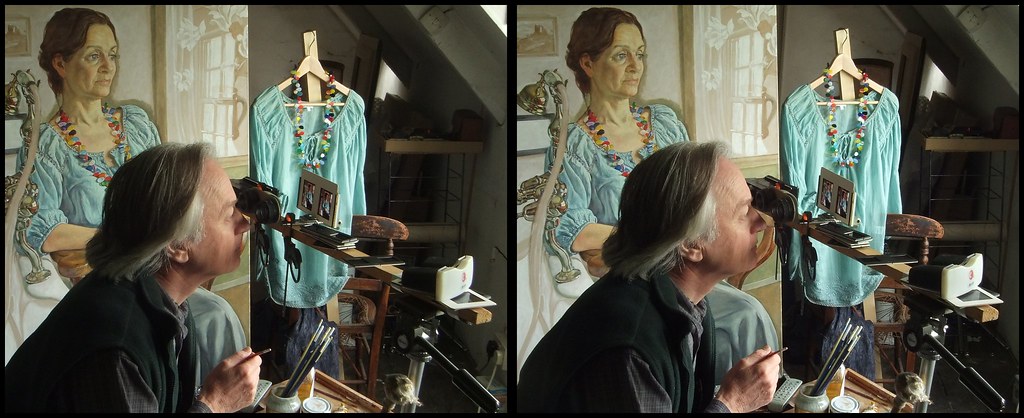
Figure 2: Michael in his studio, viewing stereo transparencies with an armature and viewer attached to a tripod, next to his easel
Using these lovely transparencies, I have found that I am freed up to concentrate on the bits that really have to be done from life: the face, the eyes, the psychological elements and capturing the pose and presence of the person. During periods when the subject is unavailable I can now set up in the studio with an armature attached to a tripod next to the easel with an array of viewers containing a little virtual sitter in its own true plotted space (Fig. 2). By turning my head a little, I can effortlessly glance at a remarkably convincing recreation of another space. This device has freed both me and the sitter, not only to render clothing, props, furniture etc. in my own studio, but also to refer back to the original pose as the painting progresses without the risk of losing my way.
I have recently added a digital Fuji W3 to the line-up, which although limited, has the advantage of an ability to zoom in on a detail and scroll around, which in the case of painting eyes, with their liquid reflections and highlights, is very useful. The lack of lenses with the auto stereo screen is quite liberating. The awful lurid colour of the W3 LCD (why did they do that?) can be toned down in the PC with Stereophotomaker, and then fed back into the camera as an MPO file. In order to avoid distortion created by the over wide lens separation and focal length I zoom in to the 35mm equivalent of about 70mm to take the shots, or stand back and crop later.
On a practical level I take a range of different exposures and versions of the pose, and have learnt with experience to cover nearly all eventualities. I also now take a number of sequential shots with a film SLR fitted with a 50mm lens for detail work (such as jewelry) or objects of particular significance, sometimes using a 35mm lens for interiors. I had a friend make up a very effective steel device of parallel bars which allows me to move the camera quickly and accurately between shots and adjust the separation according to distance (Fig. 3). Any slight movement between shots makes this largely unsuitable for the face, but hands and drapery are fine.
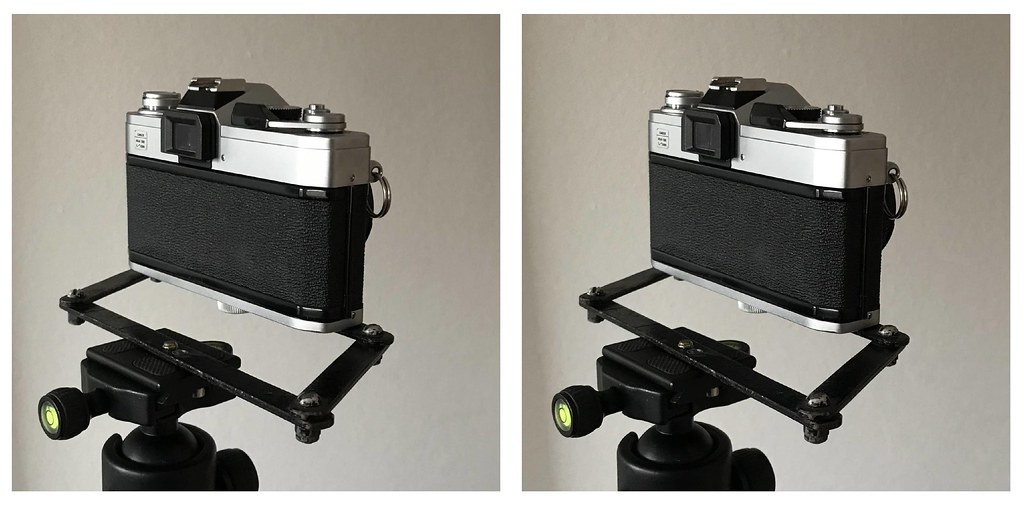
Figure 3: Michael’s custom-made steel bar device for taking sequential photos
Using an old war time metal box stereoscope fitted with the focusing lenses from two defunct Lubitel twin lens reflex cameras (leftovers from an early stereo rig) gives the perfect focal length for viewing, and a pin sharp, distortion free image.
For close ups of faces I have found that due to the high quality of the Russian optics, chips cut from the Sputnik slides viewed in 35mm RBT mounts give very good detail shots. I take everything at f16 or f22 for optimum depth of field. Incidentally, the lens separation and focal length together with small image size make a Realist format unsuitable.
For transparency film I use Ektachrome if I can get it, or Provia100 which, although slightly contrasty, gives a pretty good colour balance.
To illustrate the process in practice I will use my portrait of jazz saxophonist and composer Andy Sheppard, a commission for the Holburne Museum in Bath (Fig. 4).
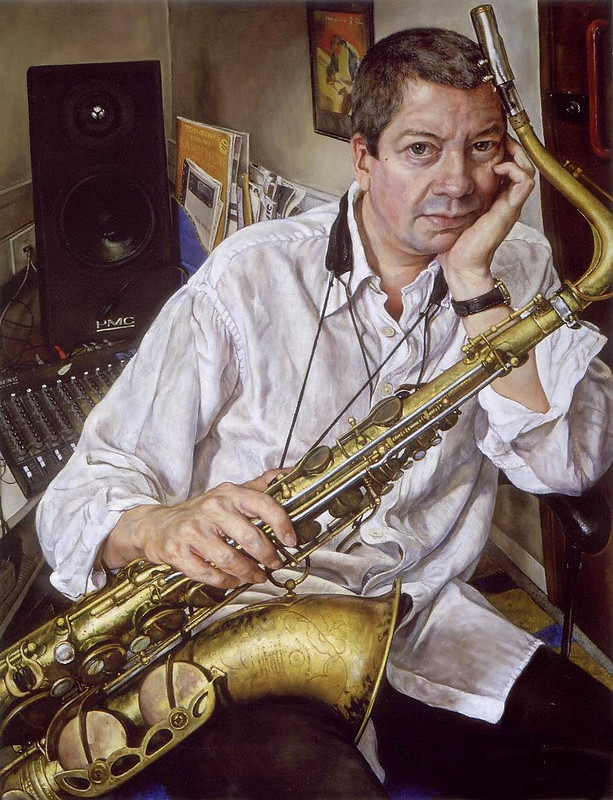
Figure 4: Andy Sheppard, oil on canvas, by Michael Taylor, 2003
All the main compositional work and the under painting were done from life in his studio in Bristol, as were the head and hands, but I didn’t feel I could reasonably ask him to sit there with a heavy saxophone on his knees for ten days. Quite apart from his having a bad back at the time (an occupational hazard apparently) the instrument was in constant use, so I was unable take it away with me. This left little option but to work from the stereo slides, which I found conveyed the lovely brassy patina, complex form and highlight dynamics very well indeed (Fig. 5). To render the delicate engraving beneath the sheen on the horn would have been very tricky without them.

Figure 5: Stereo slide showing the details of Andy Sheppard’s saxophone, which Michael Taylor used as an aid to his painting
Only when the sittings are underway do I get out the stereo camera, with the aim of trying to ensure that the photos resemble the painting as far as possible. This means that the composition, likeness, tonal values and colour balance are established from life before attempting to seek aid from the transparencies. Good as they are, they are no match for the subtle range of hue and tone discernible by the human eye, don’t allow for improvisation and are therefore unsuitable as a starting point.

Figure 6: P.D. James, oil on canvas, by Michael Taylor, 1996
The first time I used stereoscopy for a portrait was for crime fiction writer PD James, a commission from the National Portrait Gallery (Fig. 6). Not having a stereo camera at this time, I experimented with taking sequential prints to be viewed with an over/under Viewmagic viewer. This proved of limited value for the above reasons (the viewer was also very cumbersome), but it was promising enough to encourage me to take it further. I was very keen to include the enigmatic statuette of the veiled bride to make a kind of double portrait (Fig. 7). In order to avoid too much disturbance to her new novel being plotted at the time, I elected for the virtual option to complete it in the studio. Satisfactory work could also be done on her glasses, with their rather sinister reflection in the table top, back in the studio. (Fig. 8)
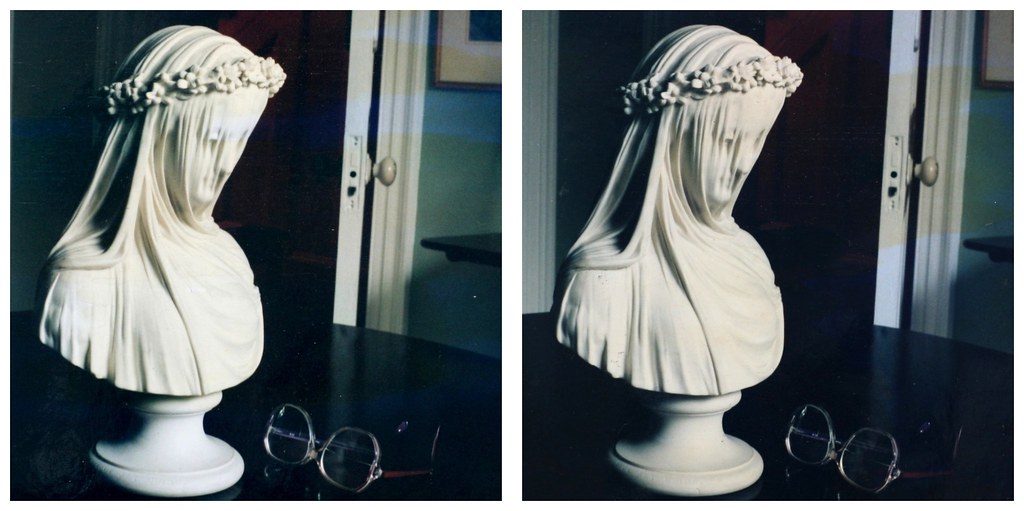
Figure 7: Stereo image showing the details of a veiled bride bust, table, glasses and background. Used as an aid to Michael Taylor’s portrait of PD James
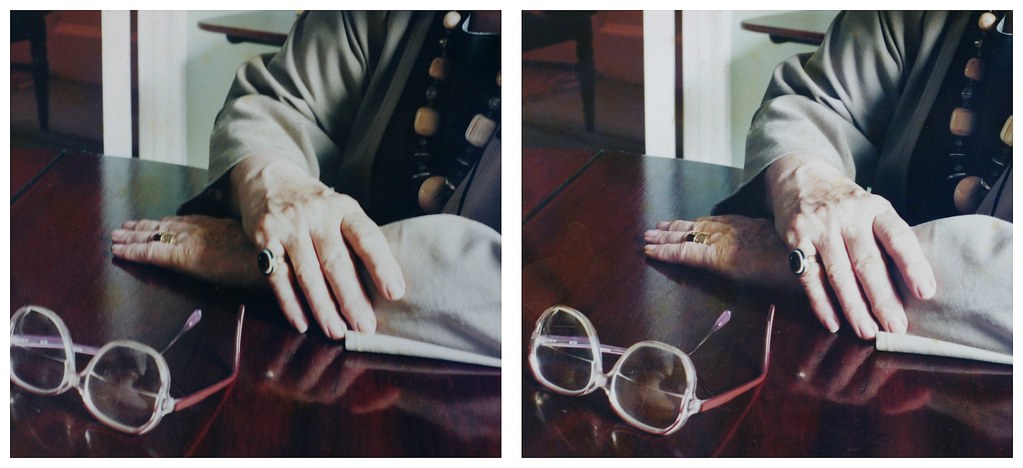
Figure 8: Stereo image showing the details of PD James’ glasses, hands and reflections
Although I often distort and change things around for creative purposes, stereos can be very useful for those little bits of difficult to retain information, such as in Girl with Water Jug (Fig. 9), where I needed to refer to how the figure looked refracted through the water, or glass handle, and the way parallax disrupts the hands. (Fig. 10)

Figure 9: Girl with Water Jug, oil on canvas, by Michael Taylor, 2003

Figure 10: Stereo transparency showing the details for the artwork ‘Girl with Water Jug’
This naturally leads me on to where stereo pairs really deliver (and, incidentally, back to Flipper): their ability to describe transparent and reflective materials. In Seated Figure with Three Tiered Table I wanted the model to gaze down at, and simultaneously through her own reflection into a spatially altered under/inner world that follows subtly different rules of perspective (Fig. 11). Seen in stereo the transparencies reveal the glass as a well-defined plane, the surface nailed by the specks of dust, scratches and smudges on it, but it still allows one to travel through it into the space below containing her reflection (Fig. 12).

Figure 11: Seated Girl with Three-Tiered Table, oil on canvas, by Michael Taylor, 2009
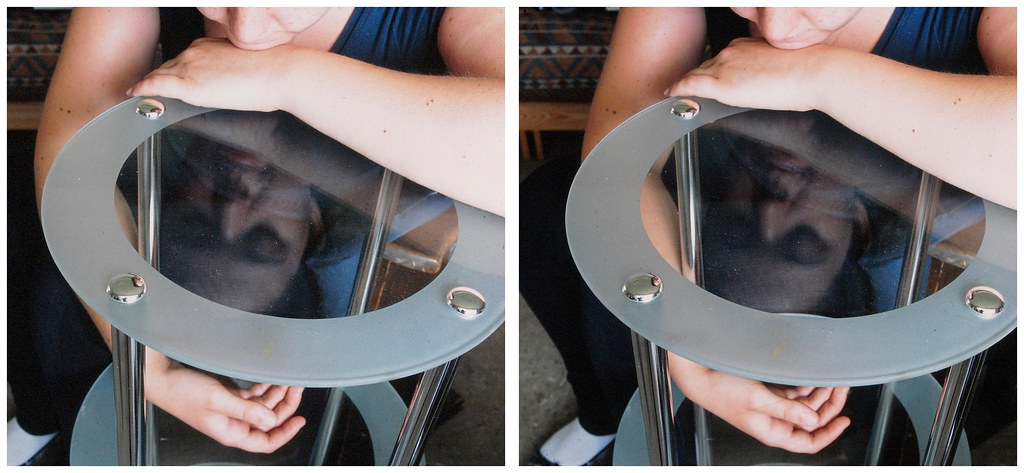
Figure 12: Stereo slide showing details used for ‘Seated Girl with Three-Tiered Table’
Likewise, the distortions to the tattoos caused by the contours of lawyer Paul Beckett’s back (Fig. 13). They are well mapped and can be clearly understood, but again would require more of his time than was practical to do them justice from life. Consequently, the form of the back was painted mostly from life, the tattoos from the slides (Fig. 14).

Figure 13: Paul Beckett, oil on canvas, by Michael Taylor, 2007

Figure 14: Stereo slide showing the details of tattoos, used as an aid for the portrait of Paul Beckett
Dismantling several pairs of charity shop binoculars to obtain parts for viewers had an unexpected benefit. I had as a consequence a number of prisms lying about, and being an inveterate fiddler about with anything optical soon accidentally made a pseudoscope (much scoffing and comments such as ‘you said it…’ from my wife) (Fig. 15).

Figure 15: Michael with his homemade pseudoscope
This device transposes to one eye the image seen normally by the other eye, and so effectively reverses depth perception. I wandered about the house gazing in complete wonder at the strangely transformed back to front world this revealed. Like the hyper-reality effect of a Camera obscura, where tiny people move around in real time, the effect is quite different from just reversing stereo photos. All the planes slid about and objects in the foreground retreated through the far wall, while receding floorboards turned inside out until they were seen as if from underneath. Bits of tree outside the window floated into the room and the convex and concave became inverted. Constancy scaling went completely haywire. After a while though, my mind seemed to wrestle it into some sort of intelligible hierarchy: strong perspective clues overrode stereoscopic ones, but any ambiguity and the space abruptly reverses. This fascinated me (I have since learned that Escher used one), and I began to introduce and experiment with some of these effects in my non-portrait work.
The history of representing the world in western art since the Renaissance has evolved around the concept of a fixed vanishing point. The space is arranged from front to back, away from the eye of the viewer (who now becomes effectively the centre of their visible world) towards infinity, or a vanishing point, using scale clues and converging perspective lines. This delightful optical toy seemed, while retaining all the necessary airy space and tangible surface textures, to offer clues to an alternative version, as hinted at in the detail below (Fig .16).
Figure 16: Still Life by Michael Taylor, showing an alternative perspective to the fixed vanishing point
Another stereo related effect that is now part of my expressive armory is the way binocular disparity makes the background ‘break’ behind objects. A line which runs diagonally behind someone’s head doesn’t appear to emerge where a ruler would suggest it might. This phenomenon which all children notice but then later forget can be pressed into service for subtly expressive results (Fig. 17).
Figure 17: Still life by Michael Taylor, showing binocular disparity anomaly effects
Ambiguity stimulates the imagination, and so surely must also stimulate creativity. These anomalies pose impossible to answer questions in the mind of the viewer which in turn stimulates him or her to become part of the creative process themselves. Visual ambiguity creates to a lot of brain activity, so stereoscopic ambiguity must create at least twice as much!
Along the way I continued to take stereo photographs just for the sheer pleasure of the effect and because I could. My first attempts were sequential 35mm slides with crudely hand cut and inaccurate card mounts viewed in an old military stereoscope. The effect was very exciting but rather hit and miss, so joining the Stereoscopic Society saved a lot of the problems: they supplied mounts ready cut of various formats and offered a journal full of useful advice. A few years later I found my first stereo camera in a junk shop, an old beaten up 35mm Edixa which came with a Photax viewer and I became totally hooked. Despite needing continual running repairs, this combination produced very nice realist format slides which for many years recorded our growing family and travels before finally becoming unrepairable (Figs. 18 & 19).
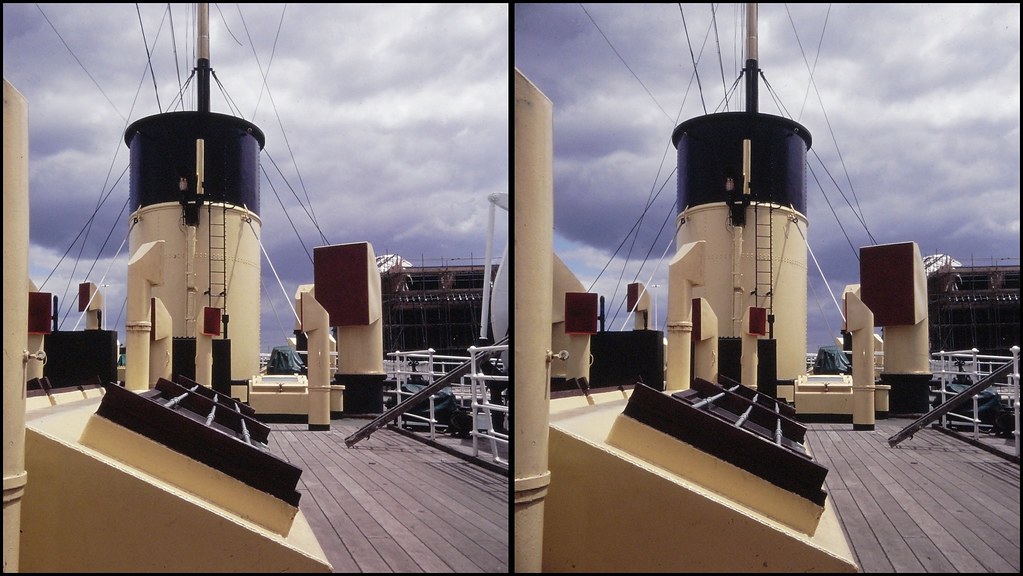
Figure 18: Stereo slide taken by Michael Taylor with a 35mm Edixa stereo camera

Figure 19: Stereo slide taken by Michael Taylor with a 35mm Edixa stereo camera
Fig. 20 shows the author at work painting its corpse, skinned, trepanned and eviscerated, as an obituary to a much loved and sadly lamented vintage stereo camera.

Figure 20: Michael in his studio, painting his beloved and broken Edixa stereo camera
Subsequently I have used a Fed 35mm stereo film camera which takes very nice 24mm x 30mm frames with a good automatic exposure system, a Fuji W3, and of course the Sputnik 120 roll film camera. I have also over the years constructed a number of rigs using compact cameras (none of which I managed to synchronize properly!)
Stereoscopic drawings have been made since the dawn of the stereoscope, and as a teenager I made many attempts, first with coloured pens and anaglyphic glasses, then later side-by-side under a viewer, but found the whole process so difficult that apart from simple geometric shapes I had to admit defeat. However, the advent of the iPad encouraged me to try again, and I was excited to find that I could make passable stereo drawings in real time with relative ease.
To begin with I used a simple anaglyphic app called Deepsketch, now unfortunately discontinued, which allowed you to change the depth of the line with a slider. It was then possible to separate the colours in a channel mixer to make left and right drawings for hand colouring. I have since found a web page created by Thomas Proffen https://tproffen.github.io/Anaglyphs/DrawingPad.html which allows you to do something similar, and he kindly added extra depth steps and line widths for me (Fig. 21).
Figure 21: Stereo drawing by Michael Taylor, made using Thomas Proffen’s webpage (see above for link)
This was fun, but upgrading to an iPad Pro with an Apple pencil opened up many interesting possibilities. After a lot of experimentation I found ways to build up more complex and subtle images, purely by eye (Figs. 22 & 23).

Figure 22: Stereo drawing by Michael Taylor, made using an iPad Pro with an Apple pencil

Figure 23: Stereo drawing by Michael Taylor, made using an iPad Pro and Procreate
The process is pretty simple, but does involve familiarity with layers and cut and paste techniques, so for those wishing to give it a try, here is a brief step-by-step photo tutorial of the method (See Figs. 23a 1-8), with a written description underneath the images.

Figure 23a 1
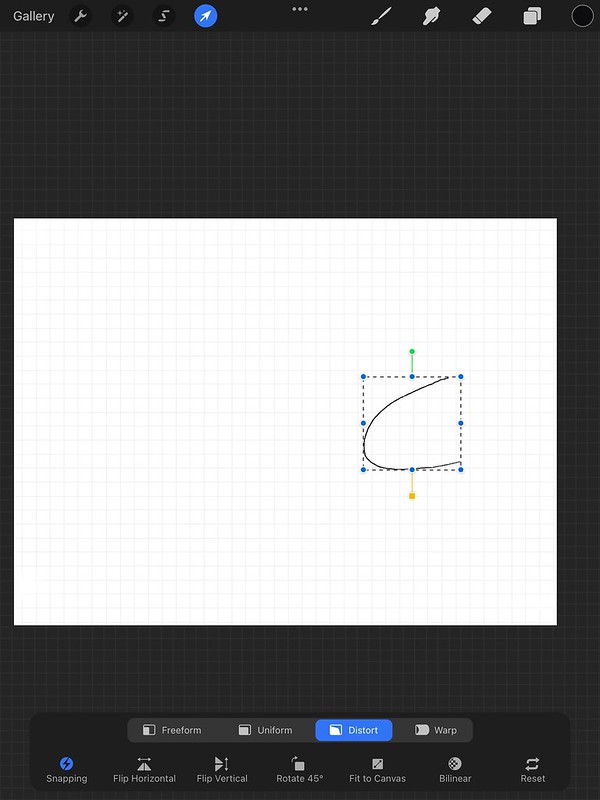
Figure 23a 2
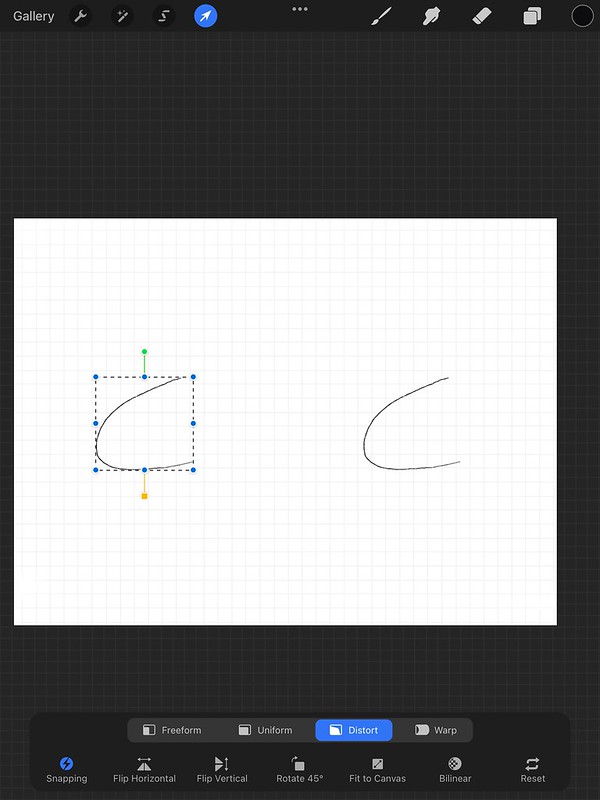
Figure 23a 3

Figure 23a 4
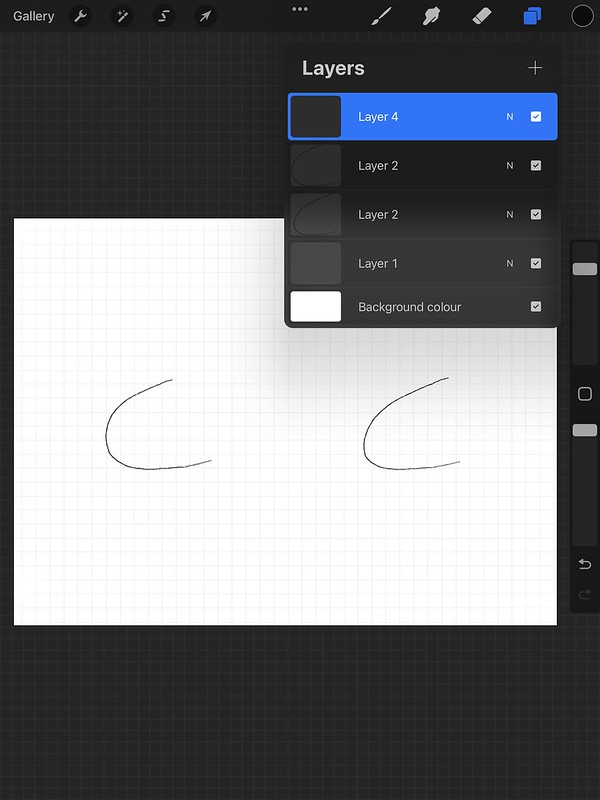
Figure 23a 5
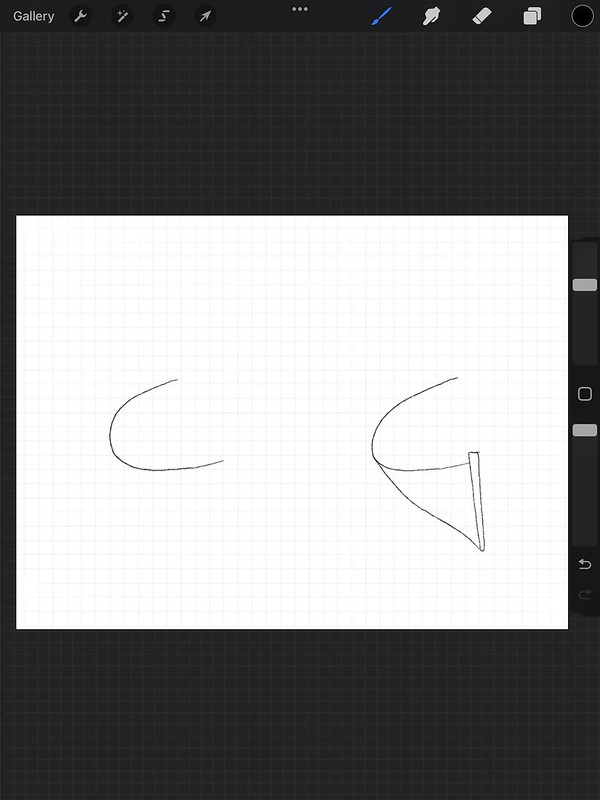
Figure 23a 6
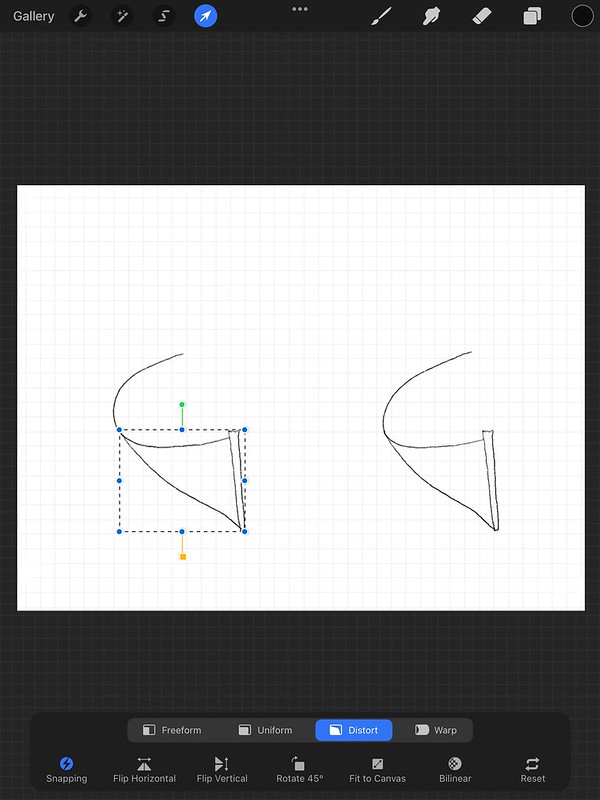
Figure 23a 7
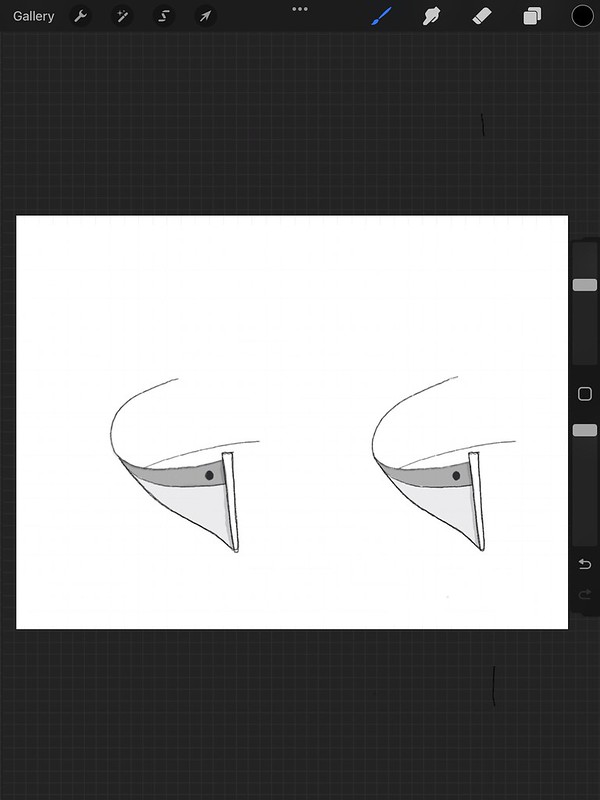
Figure 23a 8
- First create a page in Procreate.
- In the first layer put a faint grid (found in brushes : textures, you can hide it later) to aid with horizontal alignment.
- Open a new layer and draw a shape; for illustration purposes I have chosen the curve of a boat as that is quite a complex shape.
- Duplicate the layer, select it and move it across to the left making sure it aligns with the grid and enable ‘distort’.
- You can then drag the corners or centre to distort the curve while free viewing (or using a stereoscope) until the depth effect looks right. For finer adjustments the ‘warp’ tool can be used.
That’s it really; it’s quick and you can just go on adding layers, building it up in stages. I occasionally merge the layers down to avoid getting too many open at once, while saving the stages periodically means I can quickly backtrack if things go wrong! The short video is made up of some of the stages in sequence to show how it builds up (Fig. 24).
Figure 24: Video showing the stages of Michael Taylor using iPad Pro and Procreate to create a stereoscopic drawing
I have recently been having fun using the photo editor PhotoFox’s edge-selective erase tool to subversively insert Terry (a small delinquent plastic dinosaur) into a number of inappropriate places (Fig. 25), including having him photobomb Vanessa Grein’s imaginary stereoscopic nebula creations (Fig. 26).

Figure 25: Stereoview with Terry the dinosaur added by Michael Taylor using PhotoFox photo editor

Figure 26: Stereoview of nebula by Vanessa Grein, with Terry the dinosaur added by Michael Taylor using PhotoFox
Finally, if anyone has any suggestions for modifications and/or improvements to my home made drawing system, or any questions please email me at mrtayl@gmail.com and I’d be very happy to hear from you.
For anyone interested, more paintings, some aided by stereoscopy, can be seen on my website, www.mrtaylor.co.uk, or instagram @michaeltaylor5863
The section above relating to using stereos as a painting aid was adapted from my article ‘Stereoscopic Images used as an Aid to Painting’ in Stereoworld Magazine Vol 40, no 4, where to my surprise the National Stereoscopic Association awarded it the 2015 Lou Smaus Award. (which Terry discovered makes a very handy vanity mirror – Fig. 27)

Figure 27: Terry the dinosaur reflecting in Michael Taylor’s NSA award
Michael Taylor

Copyright © The Stereoscopy Blog. All rights reserved.

3 thoughts on “The Art of Stereoscopy: Michael Taylor”